
Expiries & contacts
Set up your expiries and contacts
Eleven steps, done in order. When you finish, your dates are in ExpiryEdge and a test reminder has reached your own inbox. You'll also know how to close an expiry once it's renewed.
For example: An expiry is one date you can't afford to miss, together with the thing it belongs to: the ISO 9001 certificate that runs out in June, or the supplier contract you have to cancel by 1 March.
Every step starts from the menu on the left side of the app. Click a heading in that menu, such as Reminders or Admin, to see the pages under it. Did you create the account yourself? Then you're an Admin, the role that can change every setting.
Where to click
Each step shows a path like Contacts › Contacts. Start from the menu on the left of the app.
- 1
Numbers on pictures
The red numbers on a screenshot match the short notes right under it.
Keep your place
Tick the box at the end of a step. This browser remembers what you finished.
What's already in your account
Your account isn't empty on day one. We added these at sign-up.
Three sample expiries
They show what a filled-in expiry looks like, and they send you real reminder emails. Find them under Expirations › Expiries and delete them once your own dates are in.
Ten expiry types
An expiry type is a label that sorts your dates. You start with ten, including License, Certificate, Contract and Permit. That's enough for your first expiries.
A short reminder schedule
Reminders go out 5 days before the date, 1 day before and on the day itself. That's too late for most renewals, so step 2 changes it.
You get the reminders
Until you add other people, every reminder goes to the email address you signed up with.
Your trial
You have 14 days, with room for 500 expiries and 5 users. Credits are tighter. The trial comes with 100 reminder emails and 5 SMS or WhatsApp messages, and every reminder to every contact uses one, sample expiries and test emails included. An Admin can see what's left under Admin › Settings › Usage.
When the trial ends
We never ask for a card. Reminders stop 7 days after the trial ends unless an Admin picks a plan under Admin › Billing. Your expiries aren't deleted.
Four words you'll see in this guide
They sound alike, but each one does a different job. A single expiry can use all four.
Expiry type
A label that sorts your expiries, like License or Contract. You can filter the Expiries list by type.
Expiry template
A set of extra fields you design, such as certificate number or issuing body. Every expiry that uses the template asks for the same details.
Contact
A person who gets reminders by email, SMS or WhatsApp. Contacts never need a login, so a supplier or an outside auditor can be one.
Vendors & entities
Records of who or what an expiry is about, like a supplier or a machine. They hold details but never get reminders.
Step 1 / 11
Check your timezone
Why it helps:The timezone sets the hour reminders go out and the day an expiry counts as overdue.
We guessed your timezone from your browser when you signed up. If your team works in a different zone from you, the guess is wrong.
In the left-hand menu, click Admin, then Settings.
At the top of the Settings page, click the Organization tab.
Scroll down to Timezone Settings. Under Timezone, pick the zone where your team works, not where you happen to be today.
Click Save Changes. A message at the top tells you the settings were saved.
Tip:Set the timezone before you add expiries. Change it later and the Reminder defaults page shows Timezone Mismatch Detected, with a button to move your reminders to the new zone. Your company name, logo and sender address sit on this tab too; the Settings guide walks through them.
Step 2 / 11
Choose when reminders go out
Why it helps:A reminder is an email or text sent a set time before an expiry's date. This schedule decides how far ahead each one goes out, so there's time to book an auditor or give notice on a contract.
Every new expiry copies this schedule. The starter schedule gives you 5 days' notice, which is too short to renew most certificates or end a contract. Change it before you add anything.
In the left-hand menu, click Reminders, then Reminder defaults. Check that the When to send tab is selected.
Each row is one reminder. Pick a number, then day(s), week(s) or month(s), then before or after the date. Set the Time the email goes out, in half-hour steps, such as 08:00 so it's waiting when people start work.
Click Add Row for each extra reminder. A good start is 60, 30, 14 and 7 days before, plus 1 day after.
Click Save Changes. The message Reminder settings saved appears.
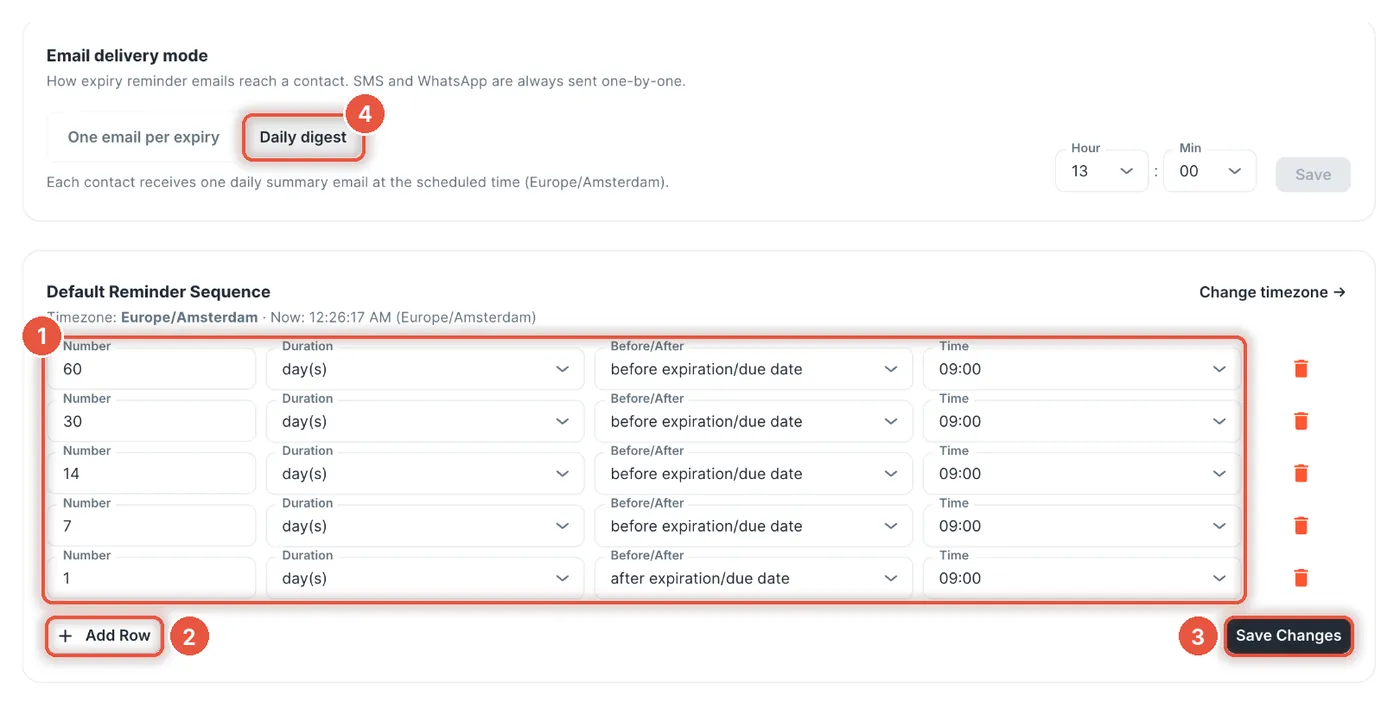
- 1
Your reminders, one per row, each with its own send time.
- 2
Add Row adds another reminder.
- 3
Save Changes stores the schedule. Nothing changes until you click it.
- 4
Daily digest bundles a contact's emails into one a day.
Watch out:The schedule only applies to expiries you add after you save it. To update older ones, open Expirations › Expiries, tick them, click Notify Settings and then Load Org Defaults.
Tip:Worried about too many emails? An Admin can set Email delivery mode to Daily digest on the same tab. Each contact then gets one summary email a day, which uses one email credit. SMS and WhatsApp messages still arrive one by one.
Step 3 / 11
Invite your team
Why it helps:Colleagues with their own login can add and update expiries themselves, and you can assign each expiry to the person who owns the renewal.
A user logs in to ExpiryEdge. A contact only receives reminders. Invite the people who handle renewals, like your quality lead or maintenance planner, before you add contacts.
In the left-hand menu, click Admin, then Users.
Click Invite User.
Type each email address and press Enter. Then choose an Invite role from the roles listed below.
Click Send Invitations. The message Invitations sent successfully! appears. Each person gets an email with a link that works for 7 days.
Admin
Everything an Editor can do. Admins also invite people and handle billing.
Editor
Can add, change, import and complete expiries. Can't manage users or billing.
Viewer
Can see expiries and complete the ones assigned to them.
Watch out:Don't add invited colleagues as contacts yourself. When someone accepts, ExpiryEdge adds them to your contacts, but not to reminders. Step 5 shows how to make them a default contact.
Step 4 / 11
Add contacts and put them in groups
Why it helps:Contacts are the people who receive reminders, inside or outside your company. A contact group is a named list, like Suppliers, and in step 5 you can add a whole group in one click.
Add the people who won't log in, such as supplier quality managers or an outside auditor. Northwind Components uses two groups: Suppliers, and Maintenance for the team that books inspections.
In the left-hand menu, click Contacts, then Contacts again. The Contacts page opens, and you're already on the list.
Next to the Groups heading, click +. Type a Group name, such as Suppliers, and click Create Group. Repeat for each group you need.
Click Add Contact. Fill in First Name, Last Name and Email Address. Only those fields are required.
Choose a Contact Group. Northwind adds Dana Lopez, quality manager at its steel supplier, to Suppliers.
Tick the box confirming you have permission to message this person, then click Create Contact. The message Contact created successfully appears.
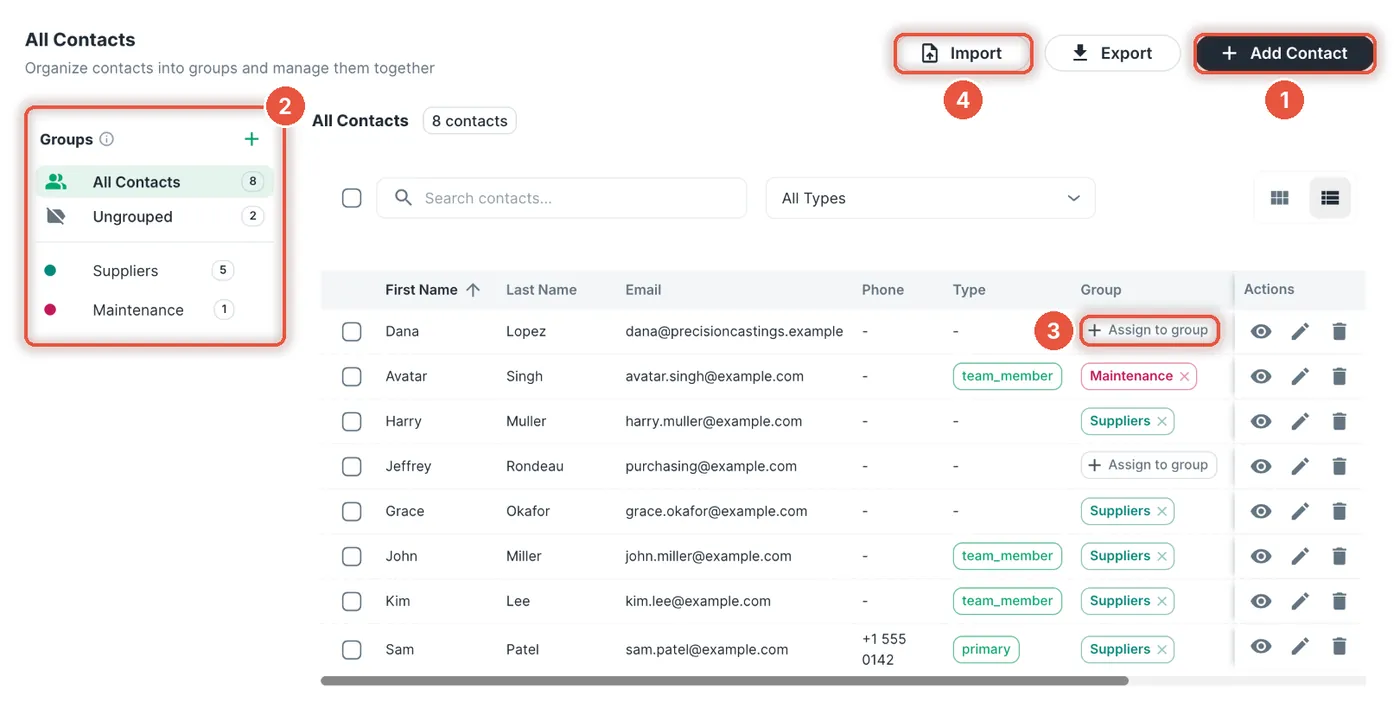
- 1
Add Contact adds one person.
- 2
Groups lists your groups. Click + to add one.
- 3
Assign to group moves the contacts you ticked into a group.
- 4
Import brings in contacts from a spreadsheet.
Watch out:One email address can belong to only one contact. If a whole team needs the same reminder, add a shared inbox such as quality@ as a single contact.
Tip:Already keep your supplier list in a spreadsheet? On the Contacts page, click Import. CSV or Excel files work, up to 5 MB and 1,000 rows.
Step 5 / 11
Choose who gets reminded
Why it helps:The people you pick here are added to every new expiry automatically, so nobody has to remember to add them each time.
These people are your default contacts. You can still change who's reminded on any single expiry later.
In the left-hand menu, click Reminders, then Reminder defaults. Click the Who to notify tab.
The left-hand list shows all your contacts. Click the arrow next to a person to move them into Default Contacts on the right. Add all next to a group name moves the whole group.
Each default contact has an icon for email, SMS and WhatsApp. Click an icon to switch that channel on or off. A coloured icon means it's on.
Click Save.
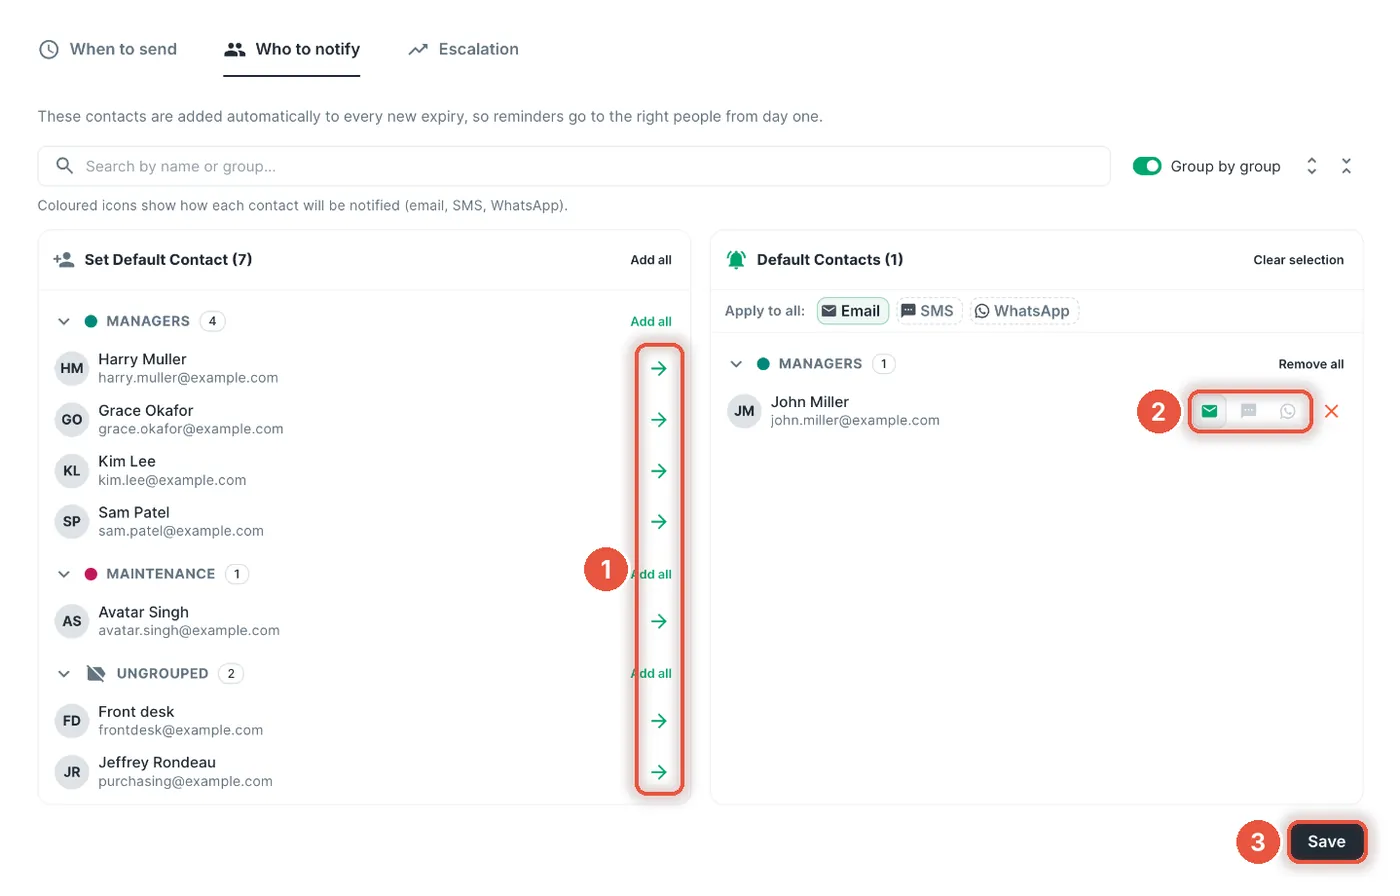
- 1
Click the arrow to make a contact a default contact.
- 2
Switch email, SMS or WhatsApp on for that person.
- 3
Save stores your choices.
Watch out:Assigning an expiry to a colleague doesn't send them reminders. Only the people under Notify Contacts on an expiry get them.
Tip:Someone missing from the left-hand list? Add them on the Contacts page (step 4). A colleague you invited appears here once they accept, so come back to this tab then.
Step 6 / 11
Check that reminders arrive
Why it helps:A test reminder shows you what the email looks like and whether it reaches the inbox or the spam folder.
Find out now whether reminders land in spam, not on the morning a certificate runs out. Do it before you bring in hundreds of expiries.
In the left-hand menu, click Reminders, then Test Reminder.
Under Email Notification, enter your own address and click Send Test Email (1 Credit). The message Test email sent successfully! Please check your inbox. appears.
No email after a few minutes? Look in your spam folder and mark ExpiryEdge Reminders as a safe sender.
In the left-hand menu, click Reminders, then Upcoming Reminders. The page lists each reminder due in the next 30 days and who will get it.
Later, once real reminders go out, open Reminders › Delivery log. Each reminder shows a status such as Sent or Failed, with the reason when one wasn't sent.
Tip:Expected an expiry on the Upcoming Reminders page but can't find it? Open that expiry. Either Notify Contacts is empty, or none of its reminders falls in the next 30 days.
Step 7 / 11
Add expiry types and templates
Why it helps:Types sort your expiries so you can filter them. A template adds the fields one kind of expiry always needs, like a certificate number or the auditor's name, so nobody forgets to record them.
Before you add expiries, check the types and build one template. Types sort your list. A template adds the extra fields one kind of expiry always needs. Northwind starts with its ISO certificates.
In the left-hand menu, click Expirations, then Expiry Types. To add a type, click New Type, enter a name such as Calibration and click Create. Each name can be used only once.
Go back to the left-hand menu. Under Expirations, click Expiry templates.
Click New Template and fill in Template Name, for example ISO certificate.
Click Add Field once for each detail you want to record. Give each field a label, such as Certificate number, and pick its type.
Tick Req'd on any field every expiry must fill in.
Click Create Template. The message Template created appears.
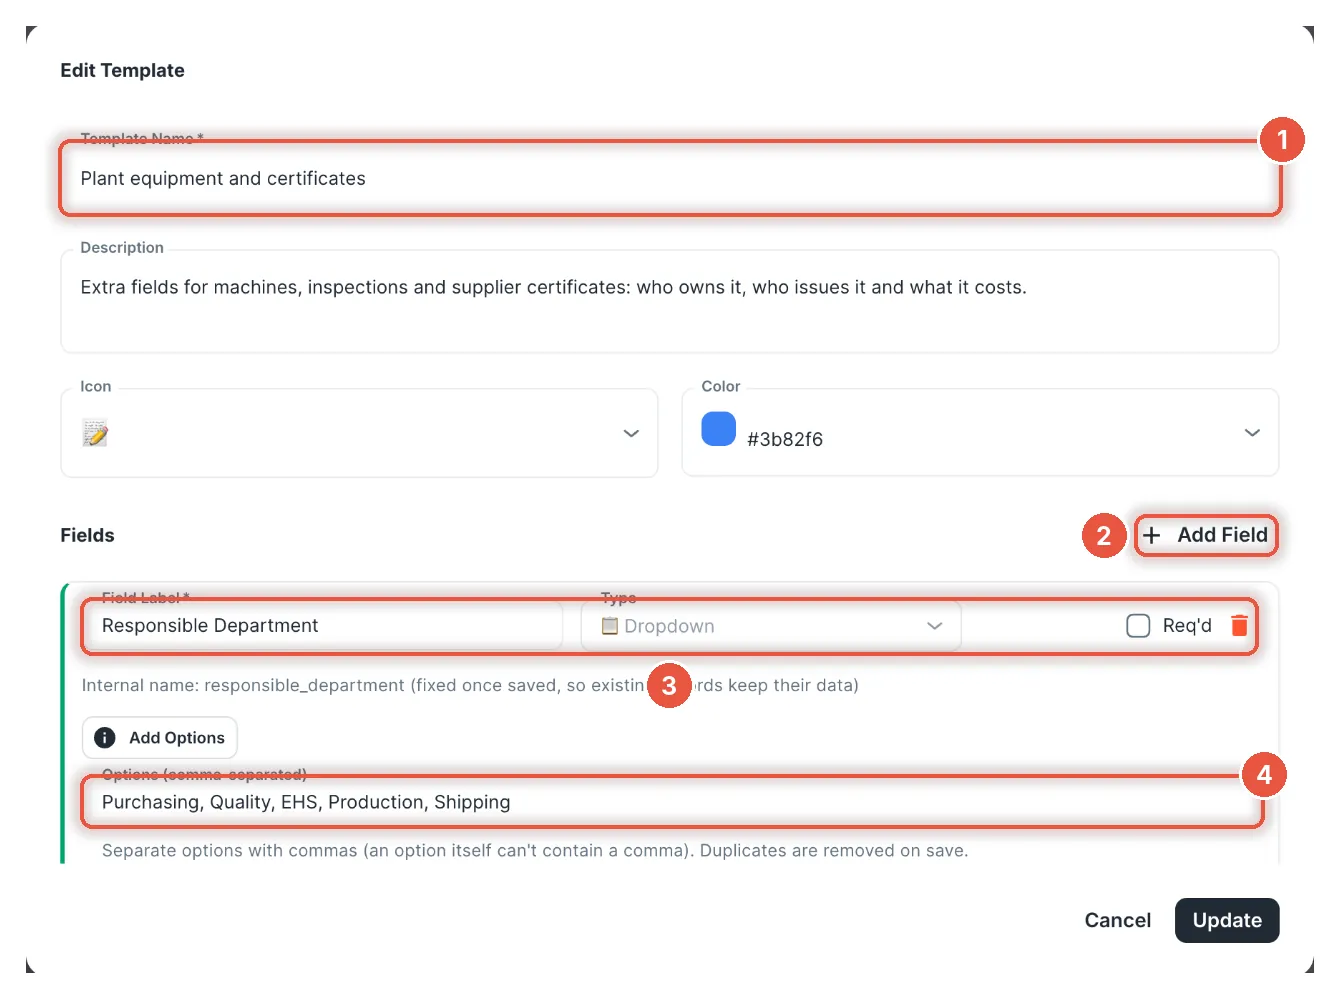
- 1
Template Name is what you'll pick later on each expiry.
- 2
Add Field adds another field.
- 3
Give each field a label and a type. Tick Req'd to make it required.
- 4
Options (comma-separated) holds the choices for a dropdown field.
Watch out:Deleting a type that's in use asks what to do with its expiries. One choice deletes them all. To keep them, pick Move Expiries or rename the type instead.
Tip:Click the eye icon next to a template to preview its fields as they'll look in the expiry form. The trial lets you create 3 templates.
Step 8 / 11
Add your first expiry
Why it helps:Adding one expiry by hand shows how the date, the people and the reminders connect before you bring in the rest.
Use a real date you're tracking right now, such as the ISO 9001 certificate that runs out next spring.
At the top of any page, click the + button, then New expiry. The Create Expiry form opens.
Fill in Name, choose a Type and set the Expiry Date. Only these three are required.
Open the Template section and pick the template from step 7. Its extra fields appear in the form, ready to fill in.
Scroll down to Notify Contacts and Reminders. Steps 2 and 5 already filled them in, so check them and move on.
Does it come round again on a fixed cycle, like a yearly forklift inspection? Tick Enable Recurring, then set Every and Period, for example 1 year. Next Renewal Preview shows the next date.
Optional: attach the certificate PDF under File Uploads.
Click Create. The message Expiry created successfully appears.
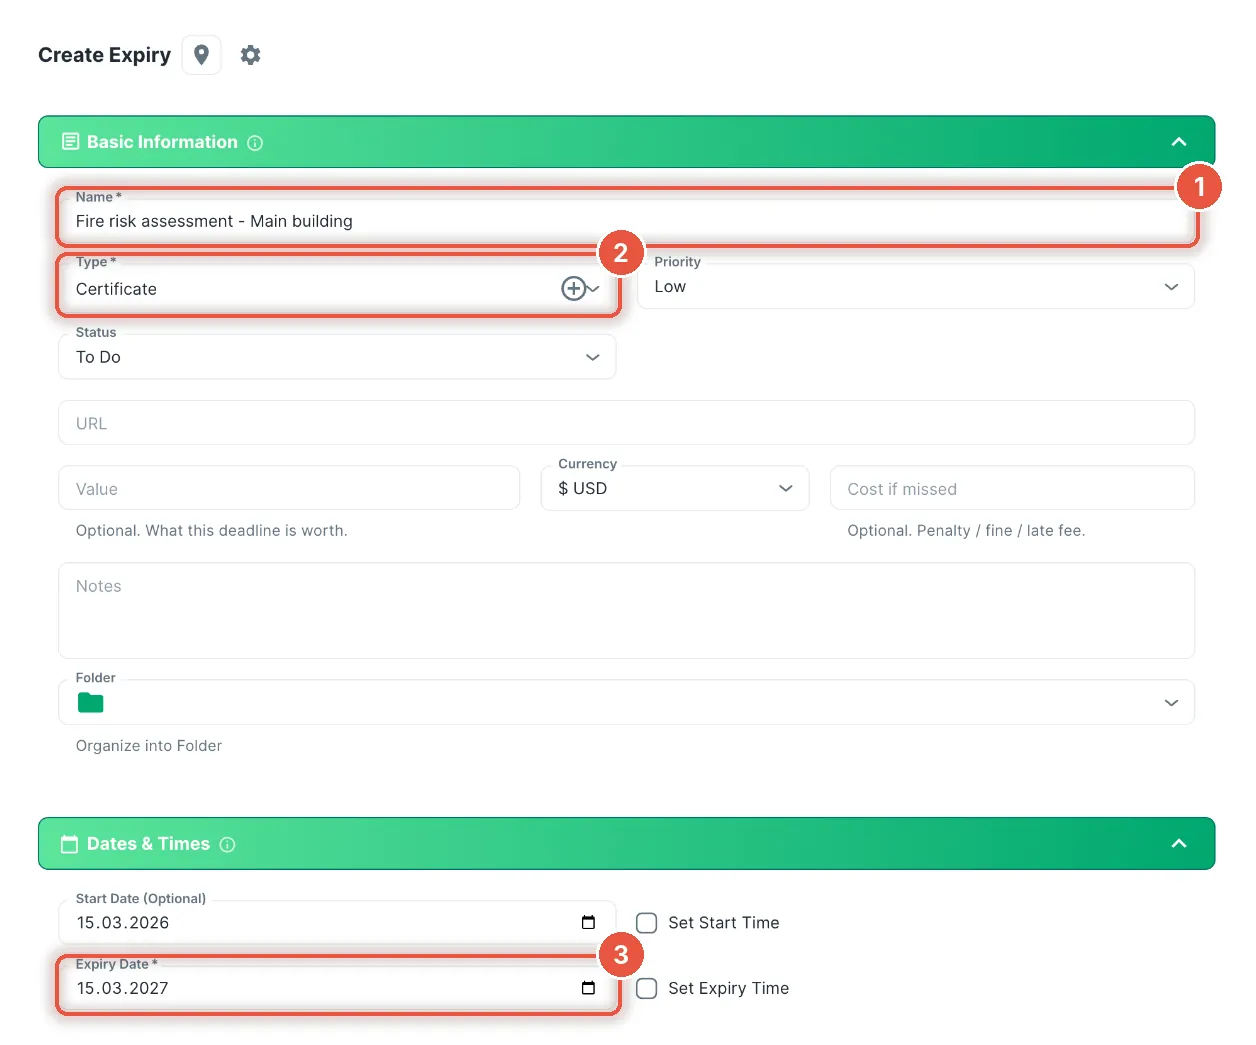
- 1
Name: say what it is, so anyone can tell.
- 2
Type: click + to add a new type here.
- 3
Expiry Date: the day it runs out. Reminders count back from it.
Find it in your expiries list
Open Expirations › Expiries to see every expiry. Switch between two views at the top of the list.
One row per expiry, sorted by date. Best for checking what runs out next and for changing many expiries at once (step 10).
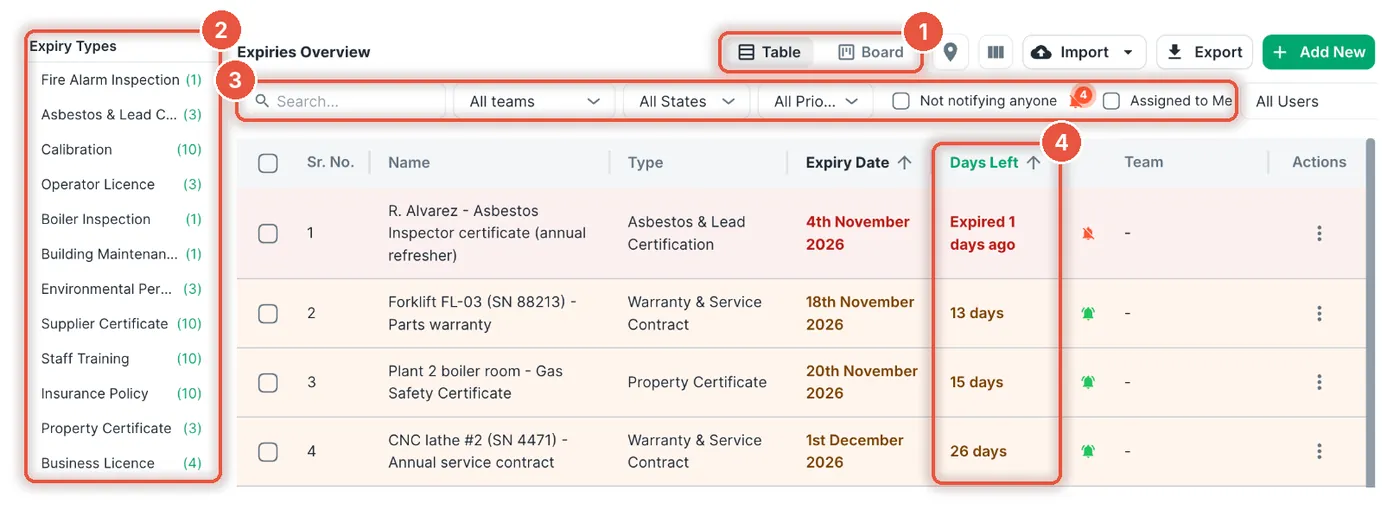
- 1
Switch between Table and Board.
- 2
Expiry Types: click one to show only that type.
- 3
Search and filters, such as team, state and priority.
- 4
Days Left: red is overdue, amber is due soon.
Tip:For a recurring expiry, pick a Renewal Mode too. With Renew as Copy, last year's record stays as history and a fresh one starts. With Renew with same settings, the same expiry just moves to its new date.
Step 9 / 11
Bulk Import
Why it helps:Bulk import reads your whole spreadsheet in one go, so you don't retype dates you already keep somewhere else.
Pick the route that matches what you have on file. All three sit under Import in the left-hand menu.
Bulk Import
A spreadsheet
CSV or Excel, up to 25 MB. Every row needs a name, an expiry date and a type.
AI Document Scanner
PDFs or photos
AI reads the names and dates from a PDF or a photo. You check every result before it's saved. The trial includes 3 scans.
Email import
Renewal emails
Forward a renewal email to your import address. AI adds the expiry or updates the one you have, and anything unclear waits for you to review.
How to import a spreadsheet
In the left-hand menu, click Import, then Bulk Import.
Drag your file into the upload box, or click Choose file.
On the Match columns step, check the Import as choice next to each of your columns. Most are matched for you.
Asked how dates like 05/06/2026 are written? Pick day first or month first. UK and US spreadsheets differ here.
Click Check 120 rows (the number is your row count). Look over the result, then click Import 120 rows.
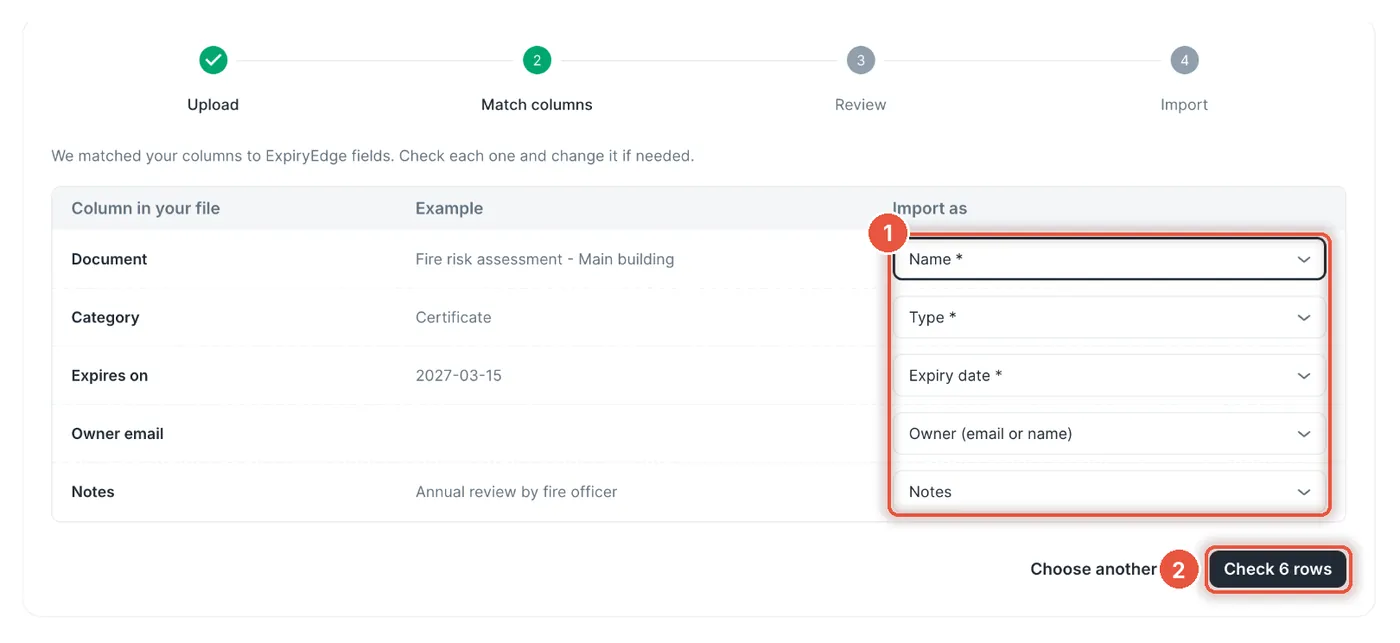
- 1
Import as links each of your columns to an ExpiryEdge field.
- 2
Check 120 rows shows what will be imported before anything is saved.
We can do it for you:Rather hand this over? Email your spreadsheet to support@expiryedge.com and we'll import it and set up the reminders for you.
Watch out:Expiries from the AI Document Scanner start with no reminders. Open Expirations › Expiries, tick them, click Notify Settings and then Load Org Defaults.
Tip:Rows with a problem are skipped, not lost. Download them with the reason, fix them and upload that file again.
Step 10 / 11
Bulk edit: update many expiries at once
Why it helps:One change reaches every expiry you tick. Handing a whole machine group to a new maintenance lead takes one click instead of twenty.
On the Expiries list you can tick several expiries and change them together. You need the Admin or Editor role, and it works in the Table view on a computer, not on a phone.
In the left-hand menu, open Expirations and click Expiries. The list of all your expiries opens.
Narrow the list first if you can. Click a type under Expiry Types, such as Warranty, or type in Search.
Tick the box at the start of each row you want. A green bar appears above the list and shows how many you picked.
To pick every row on the page, tick the box in the header or click Select All.
Click an action in the green bar. Reassign gives the expiries to another person. Notify Settings changes who gets reminders and when. Mark as done closes them.
Click the × at the left of the green bar to clear your picks.
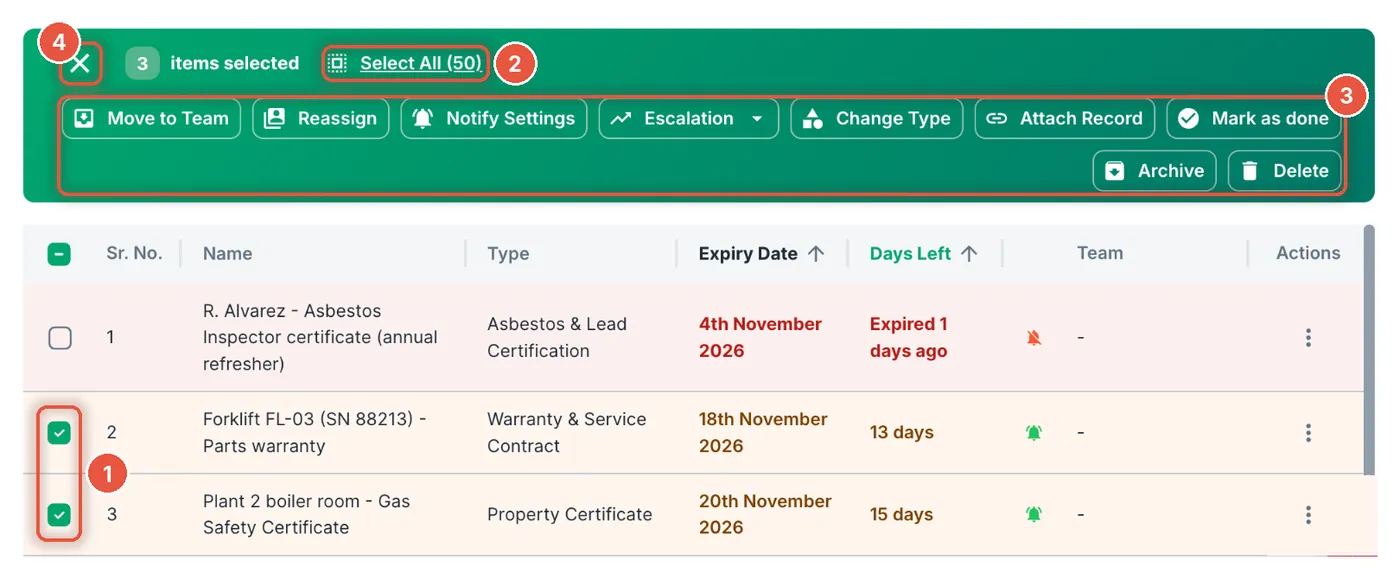
- 1
Tick the expiries you want to change.
- 2
Select All picks every row on the page.
- 3
The actions. Each one applies to every ticked expiry.
- 4
× clears your picks.
Watch out:Delete removes the picked expiries for good. It can't be undone.
Tip:Archive hides expiries from the list, and you can bring them back later. Use it for things you no longer track instead of deleting them.
Step 11 / 11
Mark an expiry as done once it's renewed
Why it helps:Marking an expiry done stops its reminders. A recurring expiry only moves to its next date at that moment. Until someone does it, the expiry stays overdue and keeps sending any reminders set for after the date.
Do this whenever a renewal is finished, for example on the day the new ISO certificate arrives.
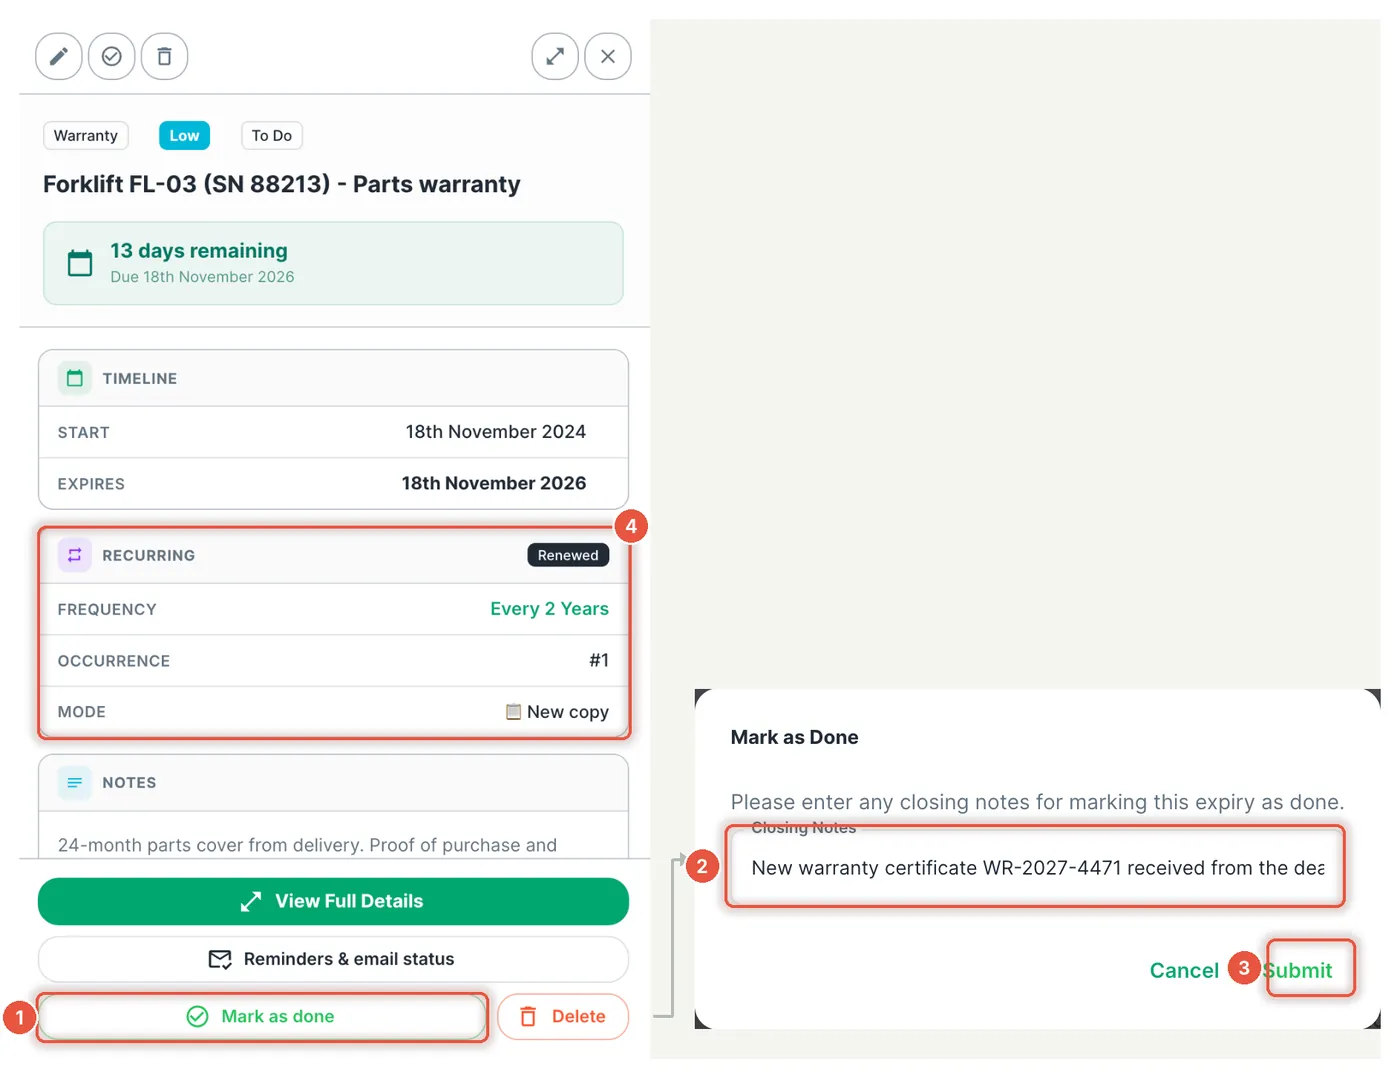
In the left-hand menu, under Expirations, click Expiries. Click the expiry you renewed. Its details open in a panel on the right.
At the bottom of the panel, click Mark as done. A small Mark as Done window opens.
Optional: under Closing Notes, write what was done, such as the new certificate number. If the expiry has a checklist, tick its required items.
Click Submit.
- 1
Mark as done, at the bottom of the expiry's panel.
- 2
Closing Notes: what was done, such as the new certificate number.
- 3
Submit closes the expiry and stops its reminders.
- 4
Recurring: this one repeats every 2 years, so a fresh copy starts once you submit.
Tip:Each reminder email has a Mark as done button too, so whoever did the renewal can close it without logging in. Outside contacts get the button as well. It's not offered when the expiry has required checklist items. An Admin can switch the buttons off with Show action buttons in reminder emails on Reminders › Reminder defaults › When to send.
Good to know
You're set up after the steps above. Come back to these when you need them.
What you'll use after setup
None of these needs setting up today. They're worth knowing once reminders start going out.
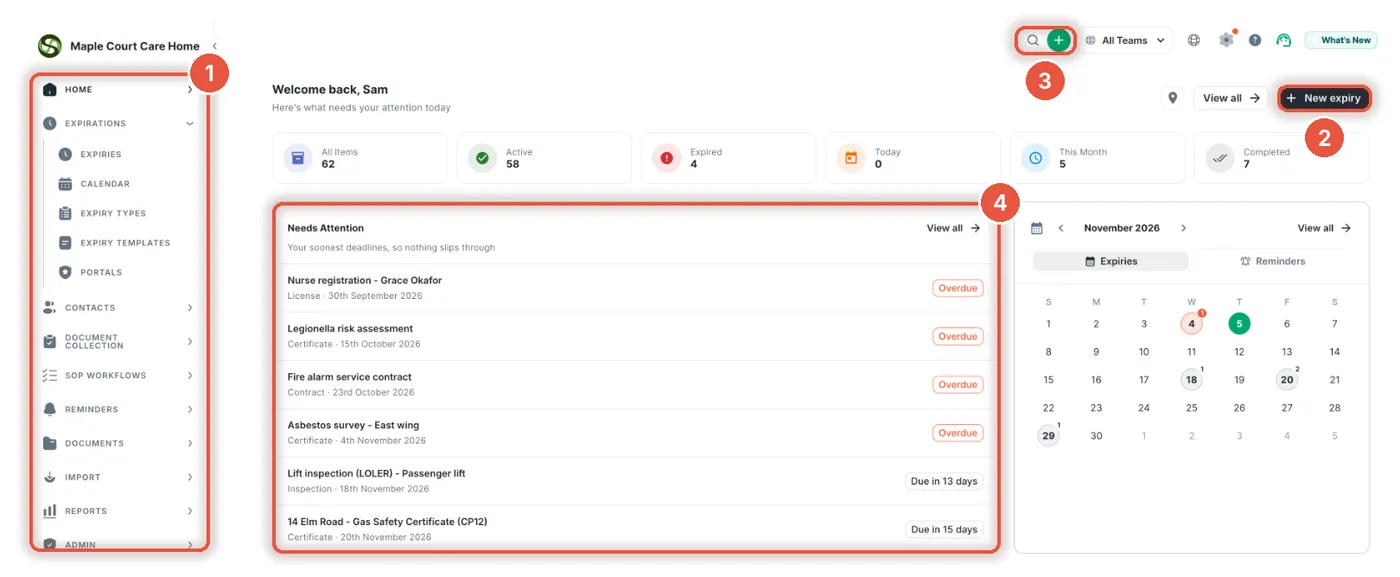
The Dashboard. Open it from the top of the left-hand menu.
- 1
Menu: every page in this guide is listed here.
- 2
New expiry adds a date to track.
- 3
Search and + for a quick add, on every page.
- 4
Needs Attention: overdue expiries first, then the next ones due.
Your Dashboard
Needs Attention lists what's late or due soon. My work, in the left-hand menu, shows only the expiries assigned to you.
Calendar
Expirations › Calendar shows your expiries month by month. Use it to plan audits around busy weeks.
Escalation
If nobody acts in time, an escalation contact such as a manager gets an email. Set it up on the Escalation tab of Reminder defaults, then switch it on for each expiry that needs it.
Snooze
Colleagues see Snooze 7 days in a reminder email. The reminders due in the next week wait 7 days, and the date itself stays put.
Email activity
Did a supplier ever get the email? Reminders › Email activity tells you if it was opened or bounced.
Monthly report
On the 1st of each month, every Admin gets a PDF summary by email.
Common setup mistakes
Each of these takes a minute to fix.
Open Reminders › Delivery log and read the reason next to the latest reminders. If the credits have run out, an Admin can check under Admin › Settings › Usage. After the trial, reminders stop 7 days in unless a plan is chosen under Admin › Billing.
Nobody marked it done, so it never moved to its next date. Open it, click Mark as done and then Submit.
Your timezone is likely set wrong. Go to Admin › Settings, open the Organization tab and fix it.
The contact needs an SMS phone number with the country code, like +44, and SMS turned on. Each text also uses a message credit.
Vendors & entities records describe who an expiry is about. Reminders only go to contacts, so add the supplier's person on the Contacts page too.
Questions new users ask
No. They get reminders by email, SMS or WhatsApp without logging in.
No. We never asked for a card, so there's nothing to charge. Reminders stop 7 days after the trial ends unless an Admin chooses a plan under Admin › Billing. Your expiries stay in your account.
Yes. The app works in your phone's browser, so there's nothing to install.
Yes. Every expiry you keep counts once, done or not. Deleting an expiry frees up its place.
Yes. Edit that expiry and change the rows under Reminders.
Click the ? at the top of the app to open the Help Guide, or email support@expiryedge.com.
Yes. On that expiry, click Add Field under Custom Fields. When many expiries need the same fields, an expiry template saves you repeating them.
No. Each contact sits in one group or in Ungrouped. Deleting a group moves its contacts to Ungrouped.
When you're ready for more
None of these is needed on day one.
Settings guide
Your company name, logo, sender address and roles.
Teams
Split expiries by site or department.
Workflows
Turn a renewal into a checklist with owners and due dates.
Document requests
Send someone a link to upload their new certificate.
Pages for auditors
Share a live, read-only compliance page. No login needed.
Type, template or vendor?
Which one to use for which job.
Add a vendor or entity
Keep supplier or machine details in one place and link them to expiries.
Stuck on a step?
Email support@expiryedge.com and tell us which step you're on. We'll help you finish it.