
Document collection
Collect documents with a link
You email someone a private link. They open the link, upload their files and fill in a short form. They don't need an account.
For example: Ask every supplier for their ISO certificate and insurance policy once a year, without chasing anyone by email.
All through this guide, Northwind Components, a parts manufacturer, asks its suppliers for their yearly documents. Swap in your own, such as staff licences, tenant insurance or contractor certificates.
Where to click
Each step shows a path like Contacts › Contacts. Start from the menu on the left of the app.
- 1
Numbers on pictures
The red numbers on a screenshot match the short notes right under it.
Keep your place
Tick the box at the end of a step. This browser remembers what you finished.
How document collection works
There are four parts. You do the first two and the last one, and the person you send to does the third.
1. Request template
Your list of what you want back: files, questions, a signature. Build it once. Next year you just reuse it.
2. Request
One template, sent to one person. That person is the recipient. Fifty suppliers means fifty requests, each with its own link.
3. They upload
The recipient opens their link, adds the files, answers your questions and clicks Submit.
4. You review
Approve each answer or send it back with a note. Approved files land in Received documents, which works like a filing cabinet for everything you've collected.
Step 1 / 4
Create a template
Why it helps:You set up the list of documents and questions once. Every supplier, every year, gets the same form.
Northwind's template is called "Supplier compliance documents". It asks for an ISO 9001 certificate, a product liability insurance certificate and a signed code of conduct, plus one optional question. You can see all four fields in the screenshot below.
In the left menu, find the Document collection group and click Request templates. Your list of templates opens.
Click the New Template button. An empty template opens. Type a name in Template name.
Click Add field. A new field appears in the list on the left, and its settings open on the right. Type the question, then pick a type such as File upload or Signature. A long form can be split with Add section or Add page.
Tick Required if the recipient can't submit without that answer. You can also add help text or limit the file types.
Click Preview to see the form as your supplier will. Then click Save template. A message says Template created successfully.
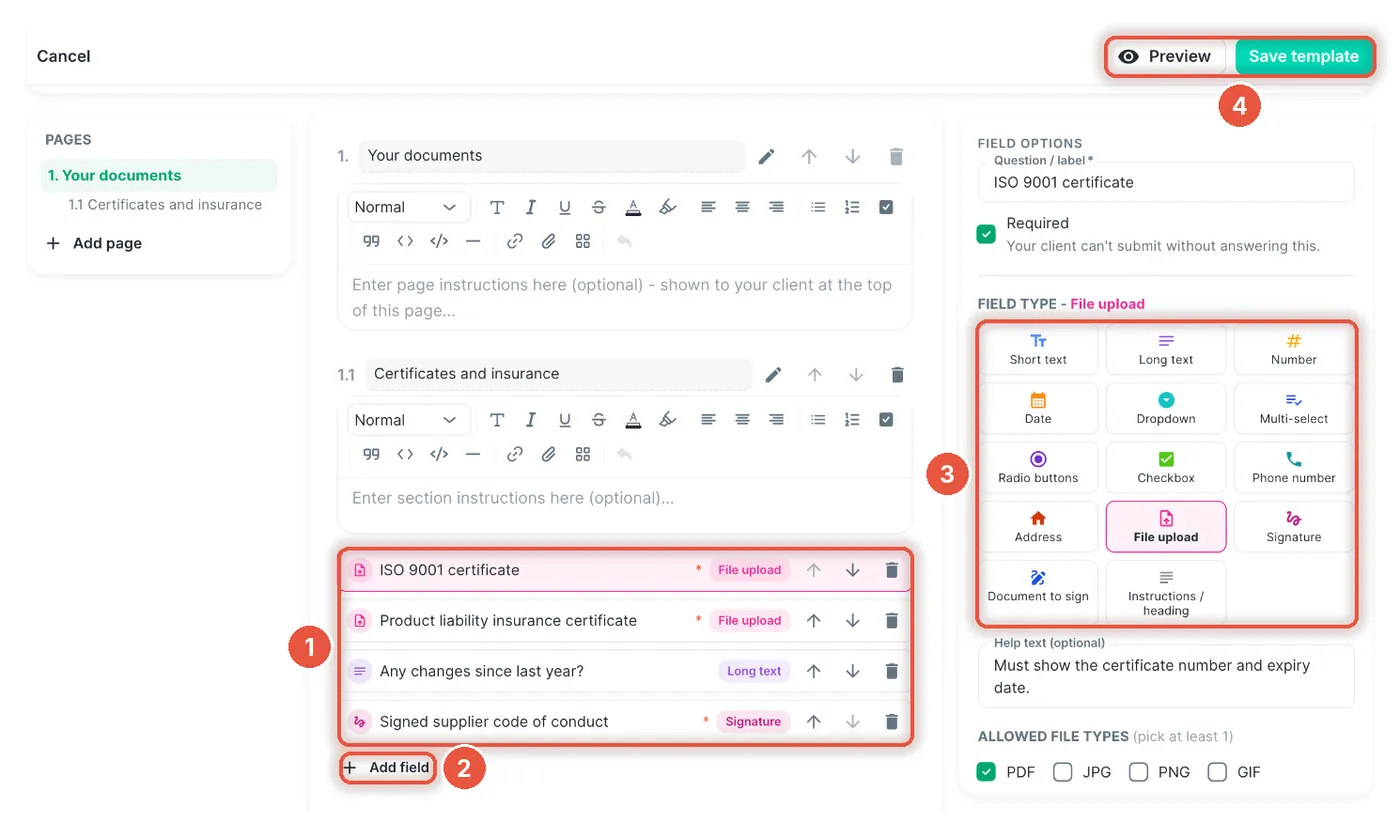
- 1
Your fields. Each line is one question, and a red star marks a required one.
- 2
Add field adds another one.
- 3
The field type sets what they give you: a file, a date, a signature.
- 4
Preview shows the form the way your supplier will see it. Save template keeps it.
Tip:Add a Reference file to a field, such as a sample certificate. Suppliers then know exactly which document you mean.
Step 2 / 4
Send a request
Why it helps:A request gives each person their own upload link. Reminder emails then follow up for you until they reply.
Northwind sends its template to Dana Lopez, the quality manager at one of its suppliers. Recipients come from your contacts, so Dana must already be saved under Contacts with her email address. Forgot someone? The person icon next to Recipients adds a contact in a new tab.
In the left menu, under Document collection, click Requests. The list of requests you've sent opens. It's empty the first time.
Click Send new request. Your templates appear. Find yours and click Use this template.
A copy of the template opens. Edits here apply to this request only, so your template stays as it was. Click Continue to send, and the send window opens.
Under Send to, keep Individual contacts and type Dana's name in Recipients. To reach a whole group of suppliers, click Contact group and pick the group.
Fill in Due date (optional) if you have a deadline. Check the Reminder schedule, then click Send request.
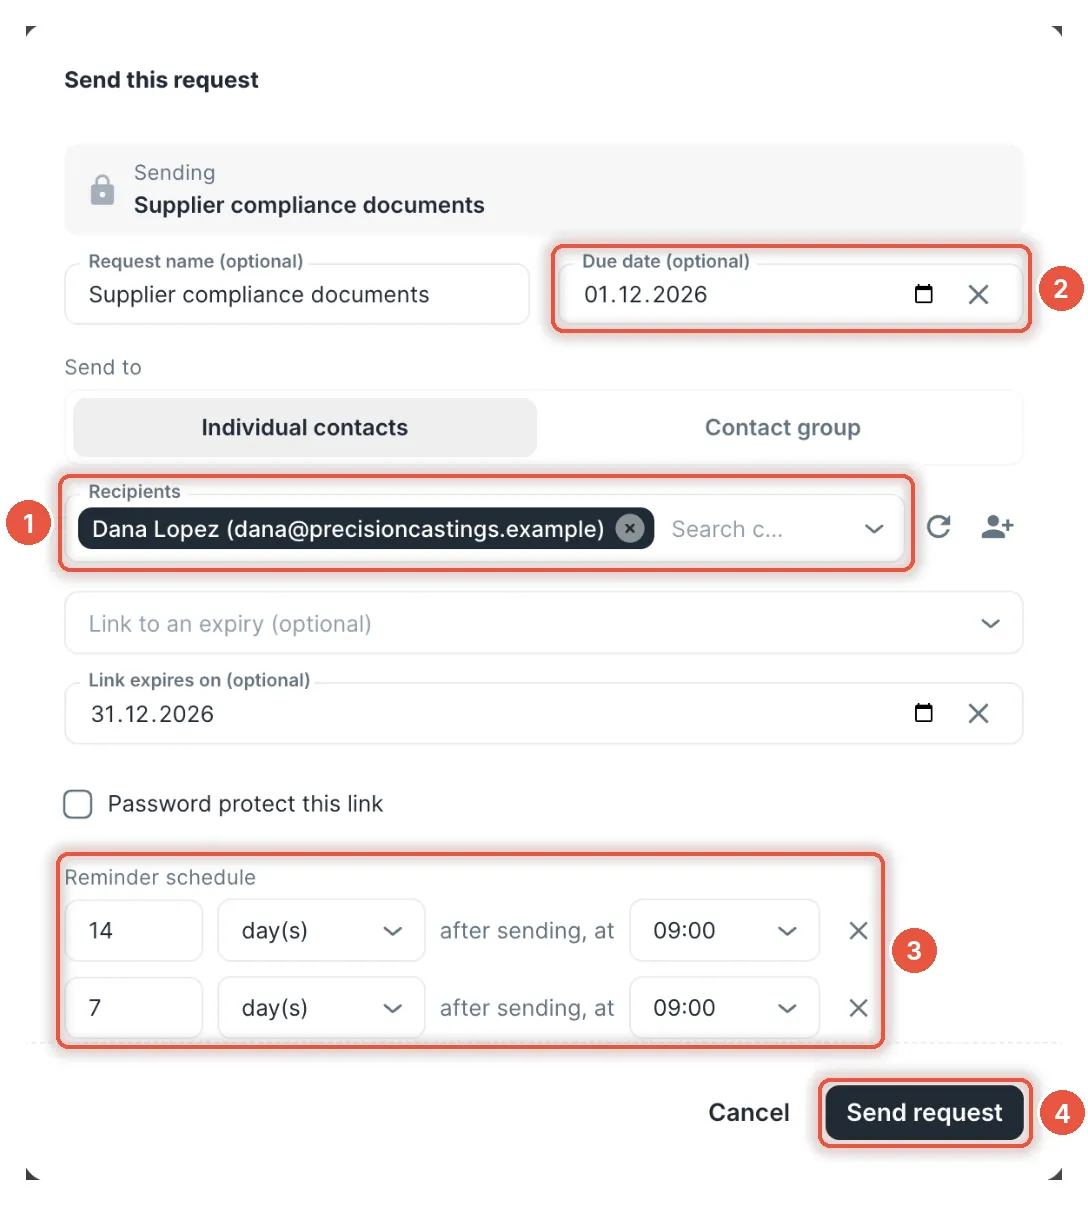
- 1
Recipients. Type a name to add each person. For a whole group, switch to Contact group just above.
- 2
Due date (optional). It's printed in the email, so they know when you need it.
- 3
Reminder schedule. Starts from your default reminders. Add or remove any.
- 4
Send request emails everyone their own link.
Watch out:Ticked Password protect this link? Don't put the password in the same email. Give it by phone or in a separate message.
Tip:Try it on yourself first. Save yourself as a contact, send the request to your own address and open the link. You'll see the form exactly as a supplier does. It uses one request from your monthly allowance.
Step 3 / 4
Track replies and review them
Why it helps:Nothing counts as received until you approve it. That's where you catch the insurance certificate that ran out last month.
Each request moves from Pending (sent) to Viewed (link opened) to Completed (submitted). Completed doesn't mean approved. It means the answers are waiting for you.
In the left menu, under Document collection, click Requests. Use the tabs above the list to filter by status.
Click a request marked Completed. The request's details open, with Dana's answers and files. Click Review submission, and Approve and Reject buttons appear next to each answer.
If every answer is fine, click Approve all. A message says Review saved, and the Review column in Requests shows Approved.
If an answer is wrong, click Reject next to it. Write what to fix under What needs to change?, for example "This certificate expired in March." Then click Request changes. Dana gets a new link showing only those items, and the reminders start again.
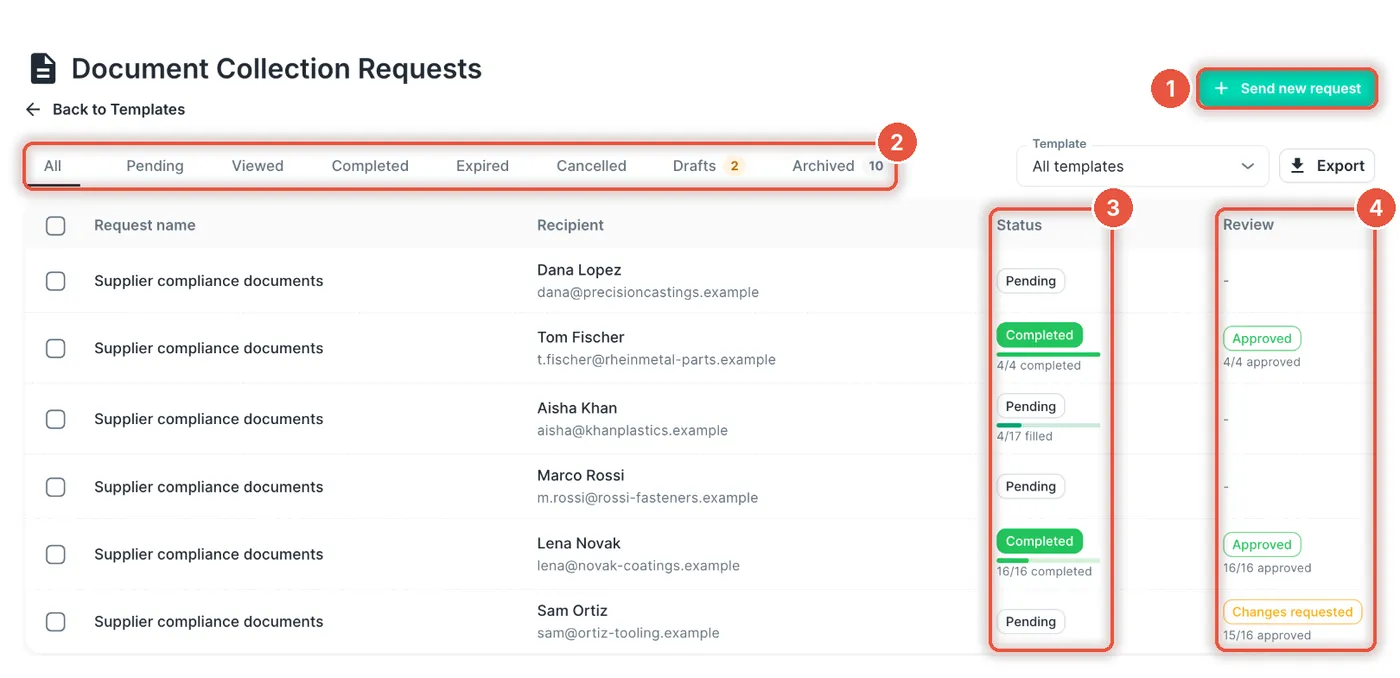
- 1
Send new request starts another one.
- 2
The tabs filter by status. Drafts holds requests you saved but didn't send.
- 3
Status: Pending, Viewed or Completed. Completed means they submitted, not that you approved.
- 4
Review: Approved once you've checked everything, or Changes requested while you wait for a fix.
Watch out:Resend, Copy link and each automatic reminder create a new link. Only the newest one works, so tell people to use the latest email.
Tip:Need a copy for your own files? Click Download (PDF + CSV + files).
Step 4 / 4
Find the files you approved
Why it helps:When an auditor or customer asks for a supplier's certificate, you open it here instead of searching old emails.
Received documents is where every file you approve ends up, sorted by the person who sent it.
In the left menu, under Document collection, click Received documents. The Document Library opens, with people listed on the left.
Click a person under People, or a whole contact group under Groups. Their approved documents appear in a list.
Find the supplier's ISO 9001 certificate and click View. A preview of the file opens.
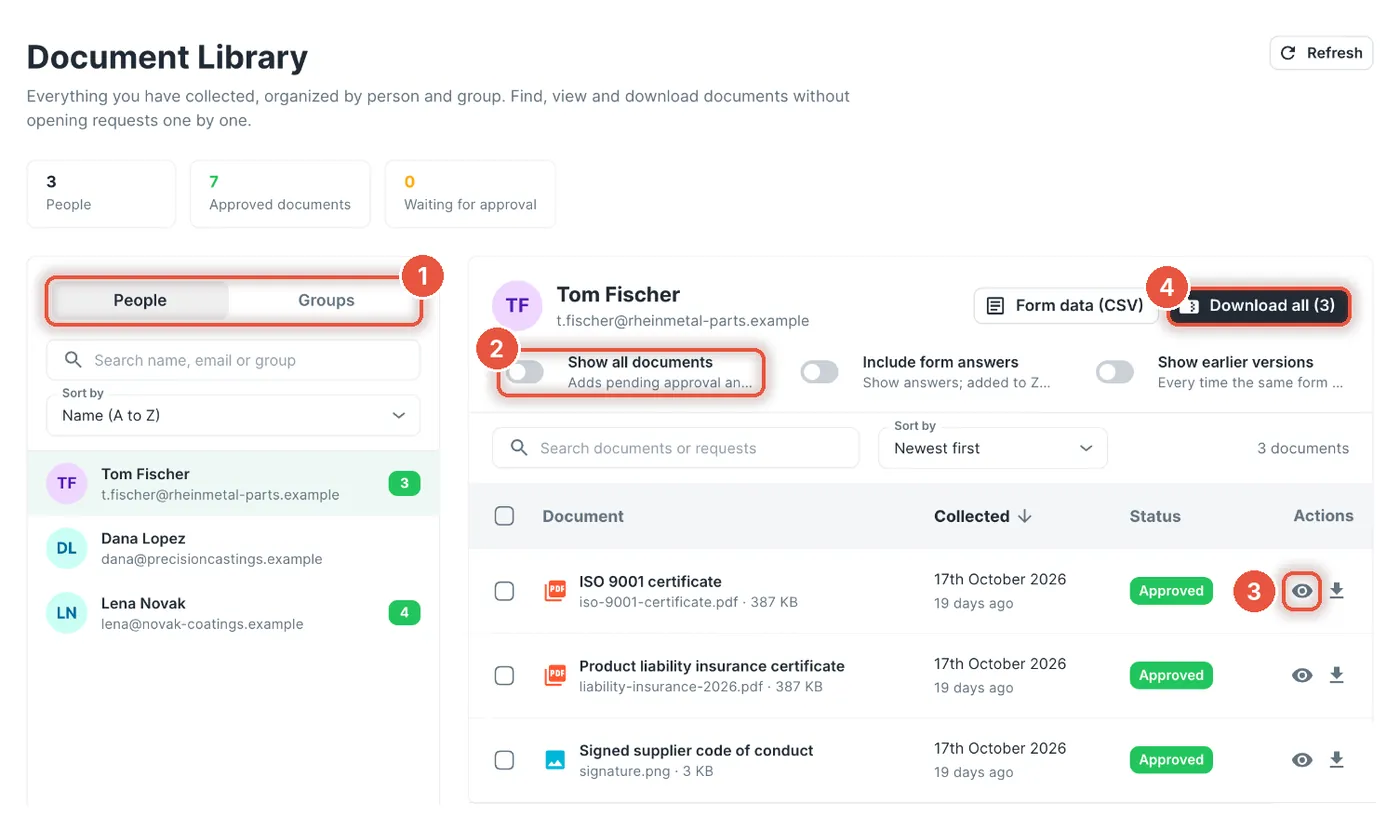
- 1
People lists everyone who sent files. Groups shows a whole contact group.
- 2
Show all documents adds files still waiting for your approval.
- 3
View opens a preview. The arrow next to it downloads the file.
- 4
Download all saves every file for this person in one go, handy when an auditor asks.
Tip:An auditor wants everything from one supplier? Click that person and then Download all.
Good to know
You're set up after the steps above. Come back to these when you need them.
What the recipient sees
Why it helps:When a supplier rings with a question about the form, you'll know which screen they're looking at.
Dana gets an email with a link. She opens it in her browser, with no login.
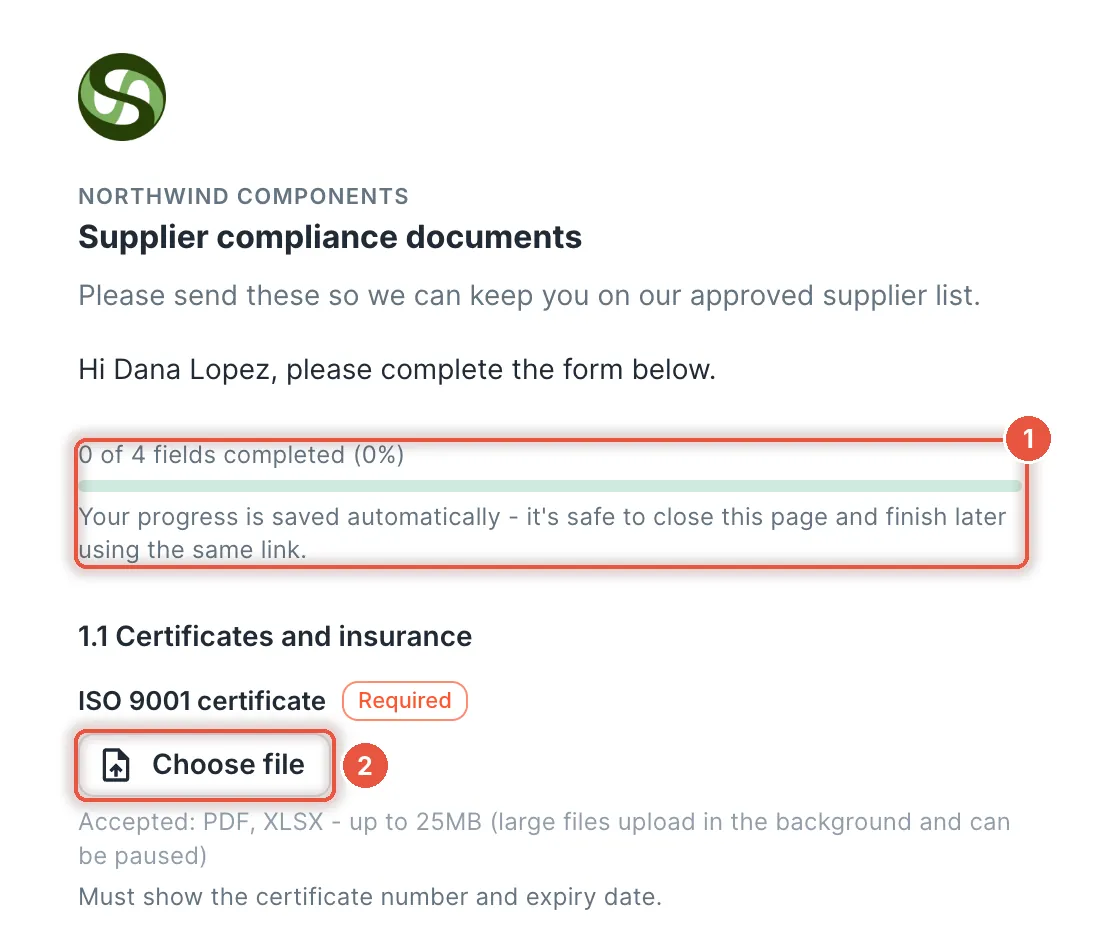
She opens the link. Your organization's name and logo are at the top of the form.
She fills in one page at a time. A bar shows how far she's got.
She clicks Choose file for each certificate. Large files upload in the background, and she can pause an upload.
She clicks Submit. A Thank you! page tells her the files arrived.
- 1
Her progress is saved. She can close the page and finish later from your newest email.
- 2
Choose file lists the file types and size you allow.
Ask for a signature on a document
Why it helps:Contracts, quality agreements and policies come back signed through the same link, with a certificate showing who signed and when. No printing, scanning or separate e-signature tool.
A request can include a PDF for the recipient to sign. Northwind asks every supplier to sign its yearly quality agreement this way. If you only need a quick signature with no document, pick the Signature field type instead: the recipient draws it on screen.
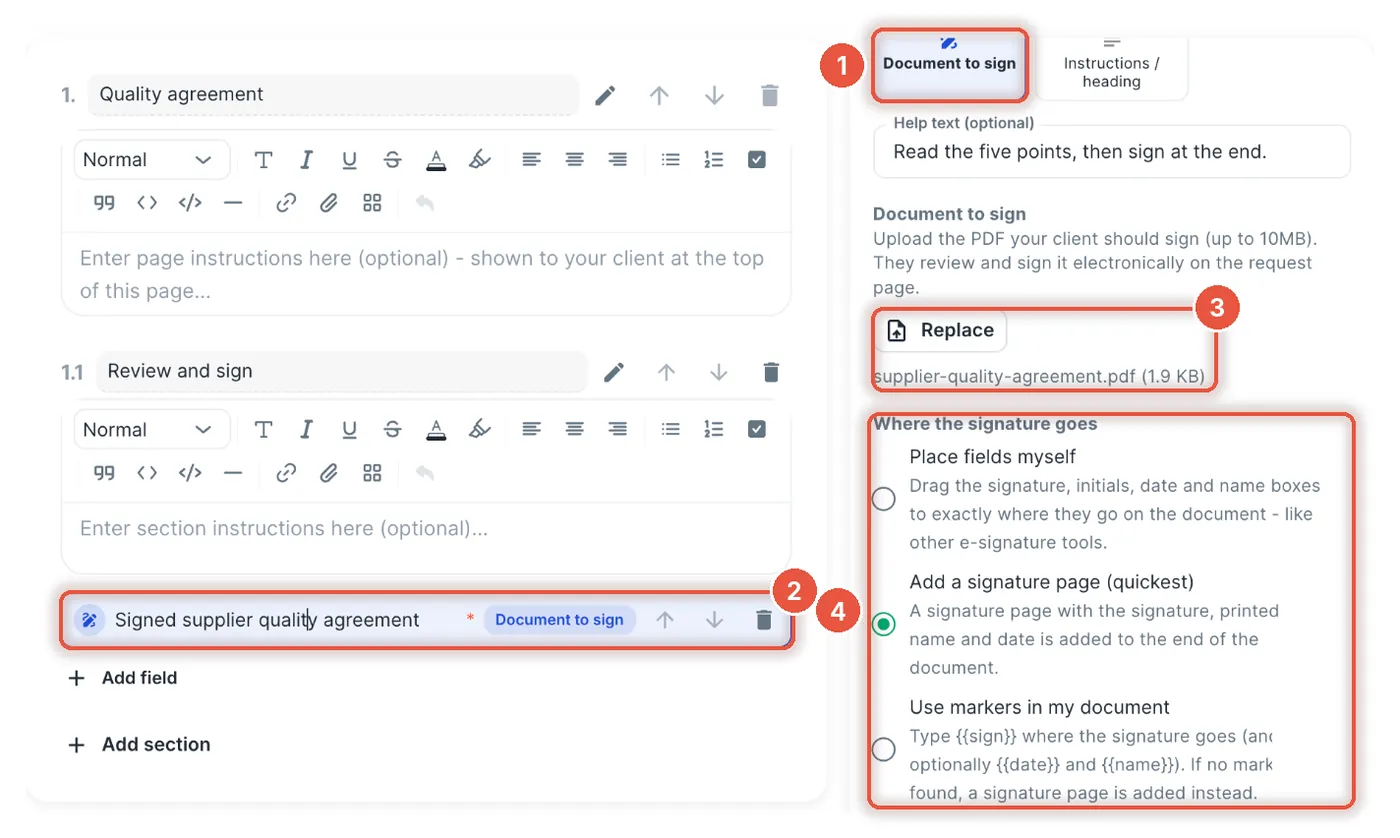
Open your request template, or create a new one as in step 1. Click Add field and type a label, such as Signed supplier quality agreement.
Under the field type, click Document to sign. Settings for the document appear on the right.
Click Upload PDF and pick the file. It must be a PDF of up to 10 MB. The file name appears under a Replace button.
Under Where the signature goes, keep Add a signature page (quickest). A page with the signature, printed name and date is added to the end.
Tick Required so the request can't be submitted unsigned, then click Save template.
- 1
Document to sign: the field type for a PDF that needs signing.
- 2
The field in your template. The red star means it's required.
- 3
The PDF you uploaded. Replace swaps in a new version.
- 4
Where the signature goes: a signature page, your own placement, or markers in the PDF.
Watch out:Each document to sign uses 1 e-signature per recipient from your plan's monthly allowance. The trial includes 5 a month. An Admin can check what's left under Admin › Settings › Usage.
Tip:Need the signature in a set spot? Pick Place fields myself and drag the signature, initials, date and name boxes onto the pages. Or type {{sign}} in your document where the signature should go and pick Use markers in my document.
How the recipient signs, and where the signed copy goes
The recipient never needs an account or a separate signing app. Everything happens on the same page as the rest of the request.
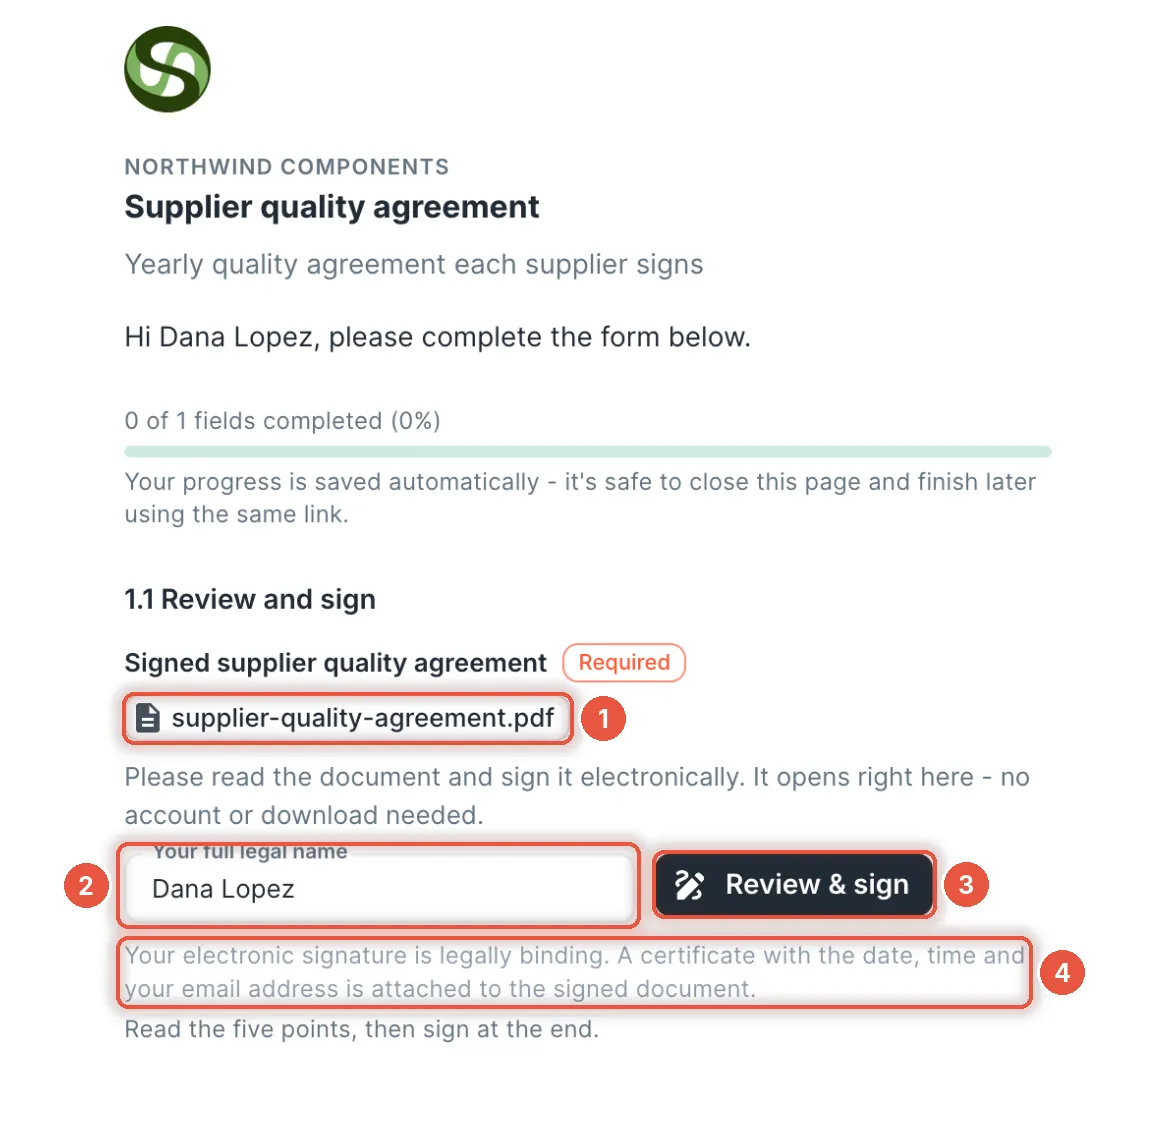
The recipient opens your request link and sees the PDF's name with a short note to read and sign it.
They type their name in Your full legal name and click Review & sign. The document opens on the same page.
Once they sign, a thank-you message confirms it. They can click Download signed copy to keep one for their own records.
On your side, open the request under Document collection › Requests. The field shows Signed by, with their name, email address and the date and time, plus the signed PDF.
- 1
The PDF they're asked to sign.
- 2
Your full legal name: they type their name here.
- 3
Review & sign opens the document for signing.
- 4
A note that the signature is legally binding and comes with a certificate.
Tip:The signed PDF carries a certificate with the date, time and the signer's email address. Keep it with the request as your proof of signature.
Send requests automatically from an expiry
Why it helps:Most supplier certificates expire every year. Link the request to the expiry and it goes out before each renewal, without you having to remember.
An expiry is a date you track in ExpiryEdge, such as the day a certificate runs out. Say you already track Dana's ISO 9001 certificate as an expiry. You need the Admin or Editor role for this.
Open the Expirations group in the left menu and click Expiries. Find the certificate, open its expiry and click Edit.
Scroll to the Auto-Send Document Requests section. It starts closed, so click its title to open it.
Click Add Trigger. A window opens. Pick your template under Document Collection Template and the recipient under Who Gets Notified.
Under When Should It Send?, pick Before Expiry and the number of days. Click Add Trigger at the bottom of the window. A message says Auto-send trigger created, and the trigger is saved straight away.
Watch out:A submission doesn't change the expiry's date, and it doesn't attach the file to the expiry. You'll see linked requests on the expiry's details page.
Tip:Leave Re-create this trigger on renewal ticked. Next year's renewal then gets its own request too. Every trigger is also listed under Automatic requests in the left menu.
Common mistakes
Check that the contact has an email address. Contacts without one are skipped.
The email didn't arrive. Check the address with them, or click Copy link and send it by text or chat.
Only approved files show at first. Turn on Show all documents to see files still waiting for review or sent back.
Cancelling doesn't give the request back, so check the recipient list before you click Send request. Unused e-signatures are the exception: they come back if you cancel in the same month.
Questions new users ask
The trial allows 30 requests and 5 e-signatures a month. One recipient counts as one request, and one send can reach up to 200 people. Resends are free.
They stop when the request is completed. They also stop if you cancel or pause it, or when the link expires.
Admins and Editors can send and review requests and manage request templates. Viewers can only look at requests and received documents.
Yes. When you edit the request template, fill in Email introduction (optional). Your text appears at the top of the request email.
Where to go next
Stuck on a step?
Email support@expiryedge.com and tell us where you got stuck. We'll help you finish it.