
SOP workflows
Your first SOP workflow
An SOP (standard operating procedure) is the agreed way your team does a job. In ExpiryEdge you save it as a workflow: a checklist of steps you can reuse. Each step has an owner, the person who does it, and a due day.
For example: A machine is due for calibration. Maintenance books the technician, production plans the downtime and quality files the new certificate. Set that order once, and each task waits until the one before it is done.
Each time you use a workflow for a real case, such as one new supplier, you start a run. This guide follows Northwind Components, a parts maker taking on a supplier called Precision Castings Ltd. You'll find everything under SOP workflows in the main menu of the app.
Where to click
Each step shows a path like Contacts › Contacts. Start from the menu on the left of the app.
- 1
Numbers on pictures
The red numbers on a screenshot match the short notes right under it.
Keep your place
Tick the box at the end of a step. This browser remembers what you finished.
Step 1 / 4
Start from a template
Why it helps:A template is a ready-made workflow. You edit a list of steps instead of writing one from nothing.
Northwind picks the Vendor Onboarding template. It's split into sections, which are stages of the job, from Qualification to Setup. Steps like Check references are already filled in.
In the main menu, find the SOP workflows group and click Workflows. The Workflows page opens.
At the top of the Workflows page, click Templates. A window called Workflow Templates opens.
Click Procurement in the list of categories. The Vendor Onboarding template shows up.
Click Use This Template. A smaller window asks you to Select Workflow Type, a label that groups similar workflows. Pick one and click Import.
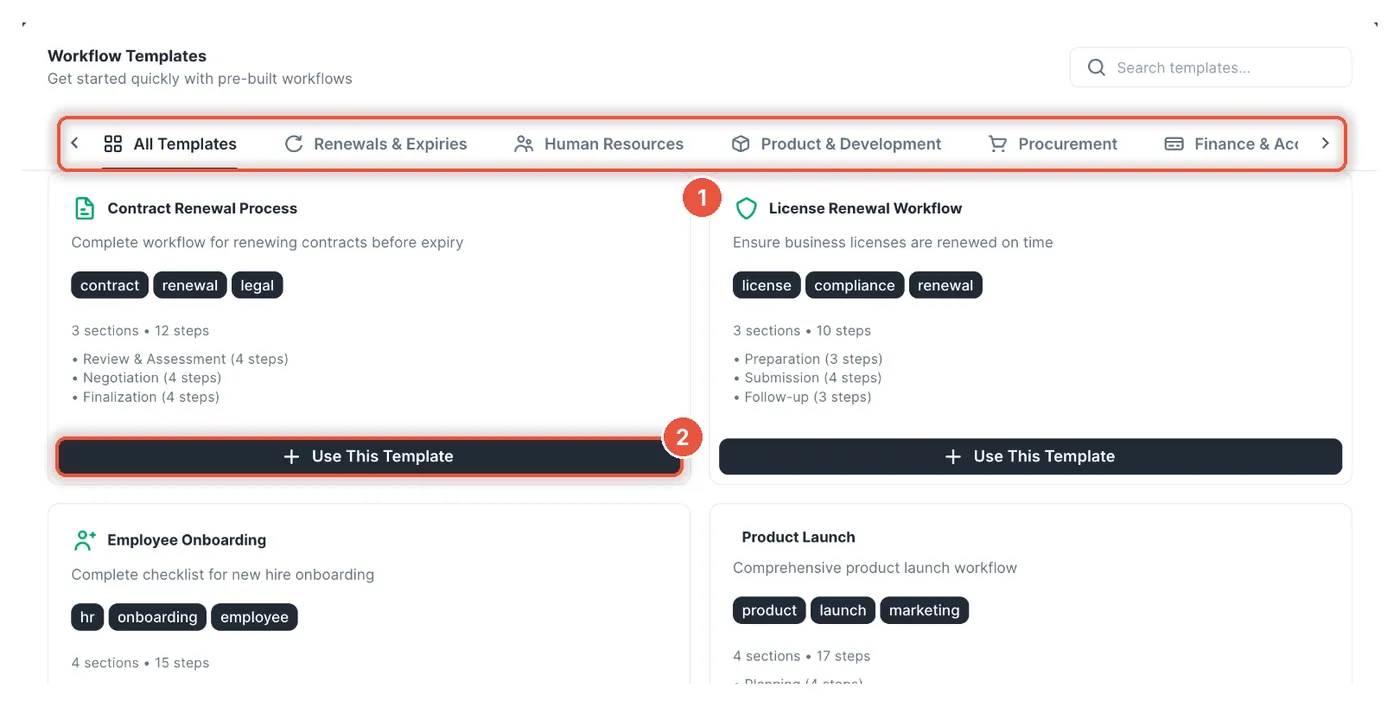
- 1
The template categories. Click one to filter the list.
- 2
Use This Template copies the template into your account as a new workflow.
Watch out:The card shows the date you created the workflow in front of its name. That date is only a label on the card. The workflow's name stays the same.
Tip:No template fits? Click New Workflow at the top of the Workflows page, type a name and click Create. The editor opens with an empty workflow.
Step 2 / 4
Edit the sections and steps
Why it helps:This turns the template into your team's real process, with a named owner on each step and a day it's due.
Rename, add or delete sections and steps until the list matches how your team does the job. Northwind also sets who does each step and by when.
On the Workflows page, click the name on the Vendor Onboarding card. The editor opens, showing each section with its steps.
To add a step, click Add Step inside a section, type a name and press Enter. Northwind adds First article inspection to Qualification, because every new casting supplier needs one.
Each step has a row of small icons. Hover over them to see their names. Click Assign to user and choose who owns the step, then look for the User assigned message.
Click Set step timing. Enter a start day and a complete-by day, then click Save Timing. Days count from the day the run starts: day 0 is that day, day 5 is five days later.
If a step can't begin until another is finished, click Set task dependencies, pick the earlier step and click Save Dependencies. Northwind's Approval to proceed waits for Compliance check.
Click Save. A message says Workflow structure saved.
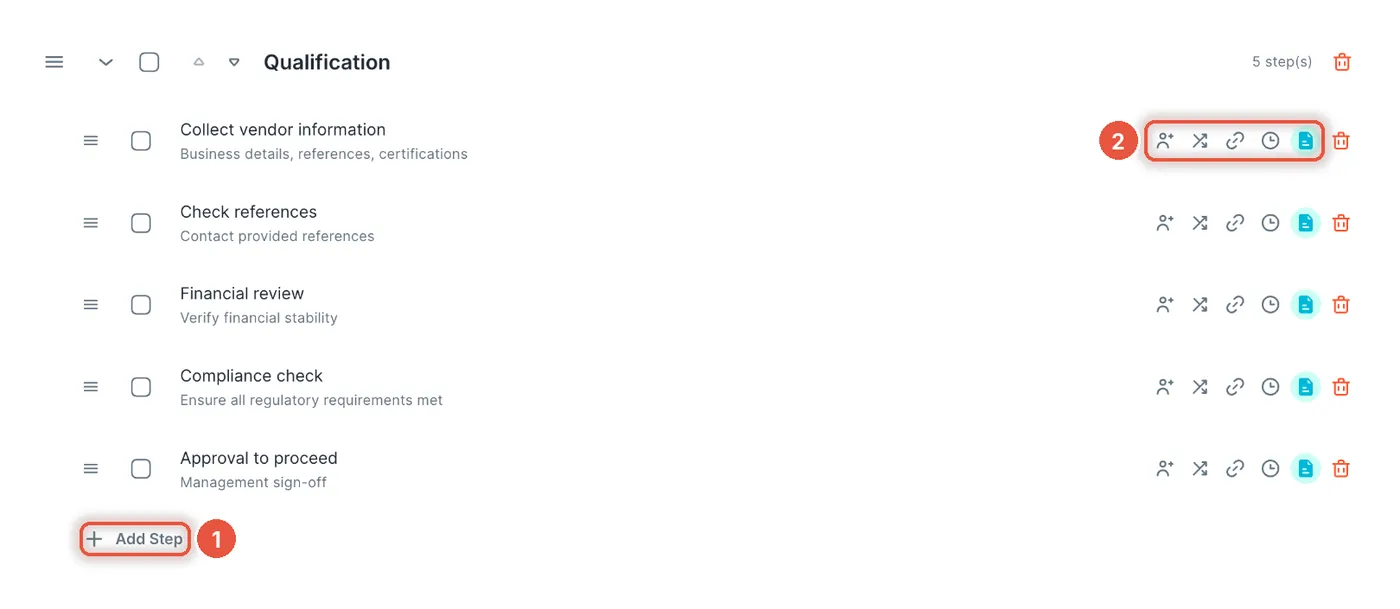
- 1
Add Step adds a step to this section.
- 2
The step icons: assign an owner, set conditional logic, set dependencies, set timing, edit details.
Tip:Need another stage? Click Insert Section, type a name and press Enter (a blank workflow shows Add First Section instead). Name steps so a new starter knows what to do: "Get insurance certificate" beats "Insurance".
Step 3 / 4
Start a run
Why it helps:A run is one use of the workflow for one case. Each supplier or renewal gets its own run, with its own ticks and dates, so two cases never mix.
Northwind starts a run for Precision Castings Ltd. The due days set in step 2 count from today, the day the run starts.
On the Workflows page, find the Vendor Onboarding card and click its ⋮ button (three dots).
Click Start New Run. A window called Start New Workflow Run opens.
Run Name already holds the workflow name plus today's date. Change it to the case, like "Precision Castings Ltd", so you can find the run later.
Optional: under Assign To, pick a person who should know about the run. They get a notice under the bell in the top bar.
Click Start Run. The app opens the page for your new run, with every section and step listed.
Watch out:Starting a run sends no email. Task owners aren't sent a notice either; their tasks just appear in My tasks. Tell them to look there.
Tip:Some jobs follow the calendar, not a case, like a monthly fire alarm test. Click Schedule in the same ⋮ menu to start runs daily, weekly, monthly or yearly.
Step 4 / 4
Work through the tasks
Why it helps:My tasks lists every task assigned to you in every run, so you don't have to open each run to find your work.
Inside a run, each step becomes a task: a piece of work for one person. Owners work from My tasks. Whoever is in charge of the process uses the run's page, which shows every task and who has it.
In the main menu, under SOP workflows, click My tasks. You see a list of the tasks assigned to you.
Use the tabs above the list to filter: All, To Do, In Progress, Overdue or Done.
When you finish a task, click Mark as Done next to it. A message says Task marked as done. To see the whole run instead, click Open run.
On the run's page, tick a task or change its status. To leave a note, add a comment. Type @ and a name to tell a colleague.
When every task in the run is done, click Mark Complete on the run's page.
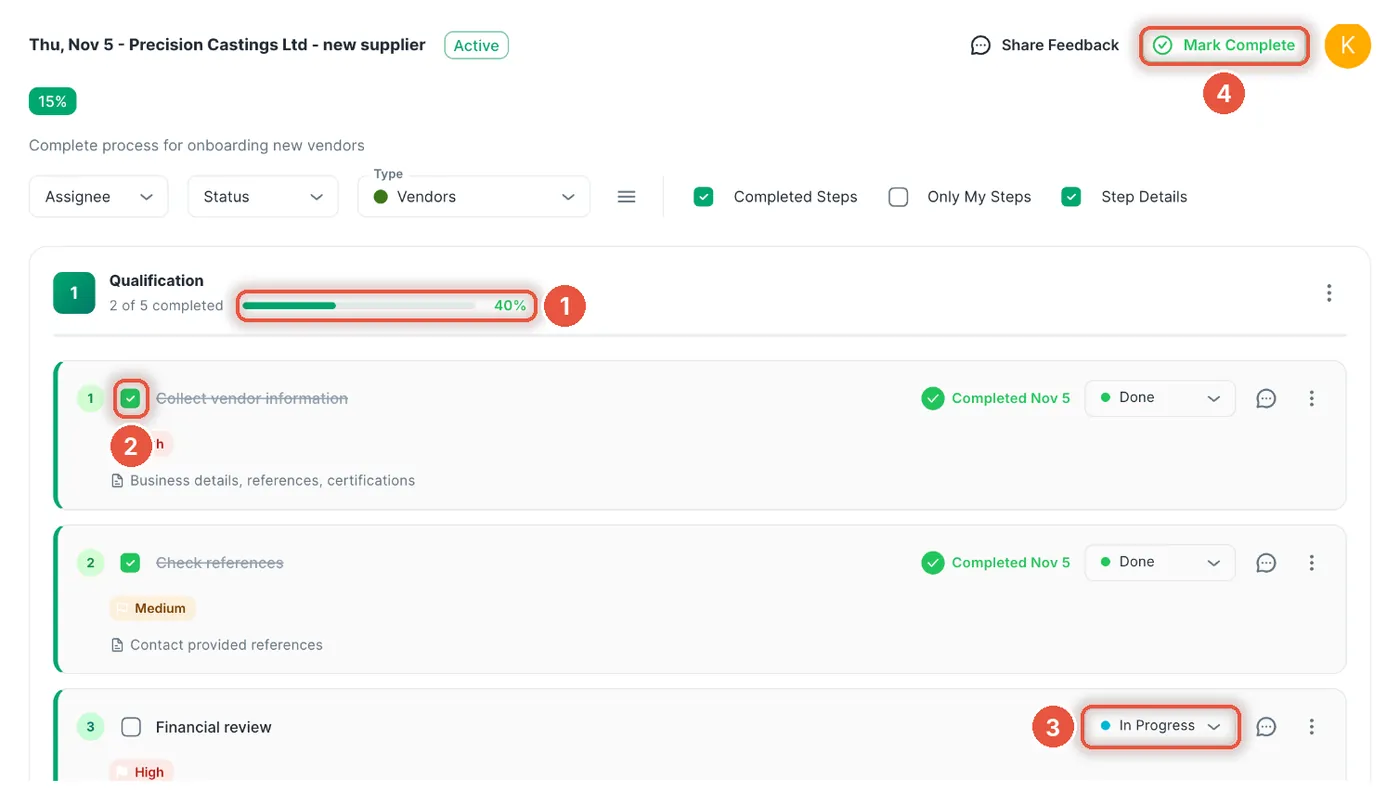
- 1
How far this section has got.
- 2
Tick a task when it's done.
- 3
Change the status: To Do, In Progress, On Hold or Done.
- 4
Mark Complete closes the run.
Watch out:A run stays open until someone clicks Mark Complete, even with every step ticked.
Tip:A task that waits on another shows Blocked. It opens once the earlier task is done. If the order is wrong, change it in the workflow editor with Set task dependencies.
Good to know
You're set up after the steps above. Come back to these when you need them.
Start it from an expiry
Why it helps:Linked to an expiry, the renewal run starts by itself a set number of days before the date, so nobody has to remember to kick it off.
An expiry is a date ExpiryEdge tracks for you, like the end of a warranty. Northwind has its forklift parts warranty saved as an expiry and wants a renewal run to start 30 days before it lapses. For a workflow like this, start from one of the Renewals & Expiries templates.
In the main menu, under Expirations, click Expiries. Click the expiry you want, here the forklift parts warranty. Its page opens.
On the expiry's page, click the Workflows tab, then Attach Workflow. A window called Attach Workflow opens.
Under 1. Choose Workflow, pick your renewal workflow from the list.
Under 2. When Should It Trigger?, click Before Expiry. Set Days to 30 and pick a Time of day. The time uses your organization's timezone.
If the expiry comes round every year, like a warranty or an insurance policy, turn on Re-attach on renewal.
Click Attach Workflow to save.
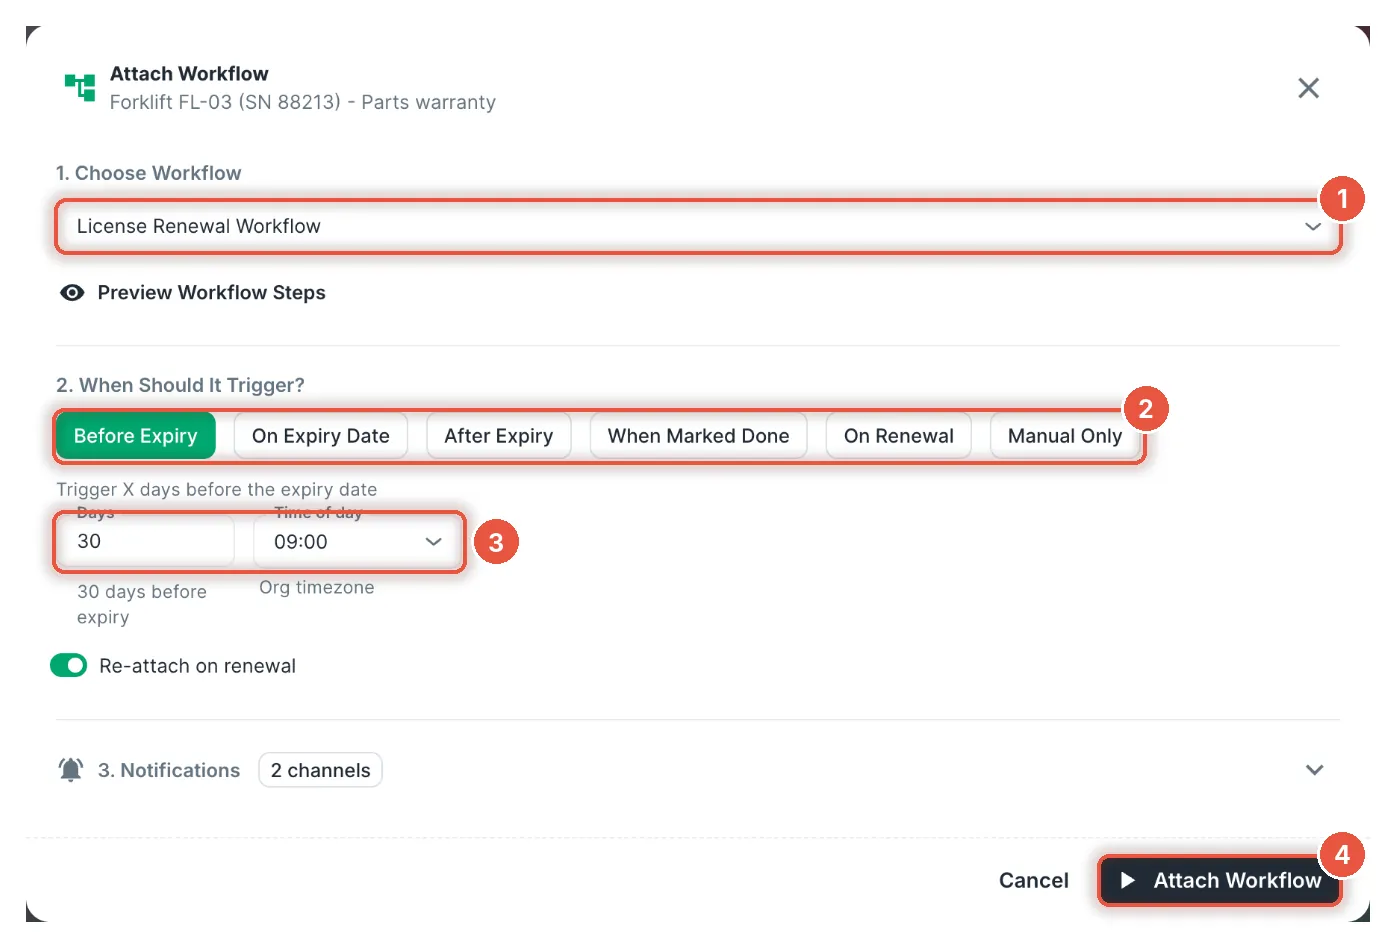
- 1
Choose the workflow.
- 2
Pick when it starts.
- 3
Set the days before and the time of day.
- 4
Attach Workflow saves the link.
Watch out:Marking the expiry done doesn't cancel the workflow, so the run still starts on its date. If you don't need it, click Detach workflow next to it on the expiry's Workflows tab.
Tip:When the run starts and when it's finished, you get an email and an app notice, because you attached it. Others are told only if you add them: open 3. Notifications in the same window and pick them under Notify Recipients.
When you need a workflow
ExpiryEdge tracks expiries: dates you must not miss, like a warranty or certificate end date. It has three tools for the work around one. Use the simplest that covers the job.
Reminder
A message before a date. It tells someone a renewal is coming. It doesn't track who did what.
Checklist on an expiry
A short tick list saved on one expiry. Fine for a few quick checks on that one date.
Workflow
Sections of steps, each with an owner and a due day. You reuse it for every case, like each new supplier, and see how far each run has got.
Common mistakes
If the app says Workflow Has No Steps, open the workflow and add at least one step. You also need the Admin or Editor role.
Its step had no timing when the run started. To fix this run, click the task's ⋮ on the run's page, choose Set dates and pick a due date. To fix future runs, open the workflow, click Set step timing on that step and click Save Timing.
Questions beginners ask
As many as you like. Workflows and runs have no limit on any plan.
Yes, on tasks assigned to them. They can change the status and add comments. Only Admins and Editors can build workflows or start runs.
Open SOP workflows and click Active Runs. Each run has a progress bar. If a percentage looks behind, reload the page.
Yes. On the expiry's Workflows tab, click Trigger now next to the workflow. One expiry can hold up to 5 attached workflows.
ExpiryEdge checks about every 30 minutes, so a run can start up to half an hour after the time you picked. To see runs waiting to start, open SOP workflows › Scheduled Triggers.
When you're ready for more
Create a workflow
Every option in the workflow editor.
Scheduled triggers
Pause, cancel or start early the runs waiting on a date.
Attach a workflow to an expiry
Every trigger, from Before Expiry to When Marked Done.
Getting started
New to ExpiryEdge? Set up the basics first.
Document collection
Ask suppliers to upload their certificates.
Stuck on a step?
Email support@expiryedge.com with the workflow name and what you see. We'll help you sort it out.