
Settings
Set up your account settings
Settings holds the details every reminder depends on: your company name and logo, who the emails come from, where replies go, and who on your team can sign in.
For example: A supplier gets a reminder from "Northwind Components" about their ISO 9001 certificate. When they hit Reply, the answer lands in quality@northwind.com, not a no-reply inbox.
In ExpiryEdge, an expiry is any date you track, like a certificate, contract or licence end date. We'll set up Northwind Components, a parts maker that chases supplier certificates. You do most of this once, and each step takes a few minutes.
Where to click
Each step shows a path like Contacts › Contacts. Start from the menu on the left of the app.
- 1
Numbers on pictures
The red numbers on a screenshot match the short notes right under it.
Keep your place
Tick the box at the end of a step. This browser remembers what you finished.
Who can change settings
A role decides what a person may do in ExpiryEdge. You pick a role when you invite someone, and an Admin can change the role later on the Users page.
Admin
Everything an Editor can do, plus inviting people, changing roles, billing, usage and the Organization tab. Keep this to one or two people.
Editor
Adds, changes and completes expiries. Can also edit email templates, reminder defaults and teams, and send test reminders. Can't invite people.
Viewer
Sees expiries and completes the ones assigned to them. Can't change anything else. Fits a plant manager who only checks status.
Step 1 / 4
Find your way around Settings
Why it helps:Each card on the Overview tells you what its area controls, so you can find a setting without guessing which page it's on.
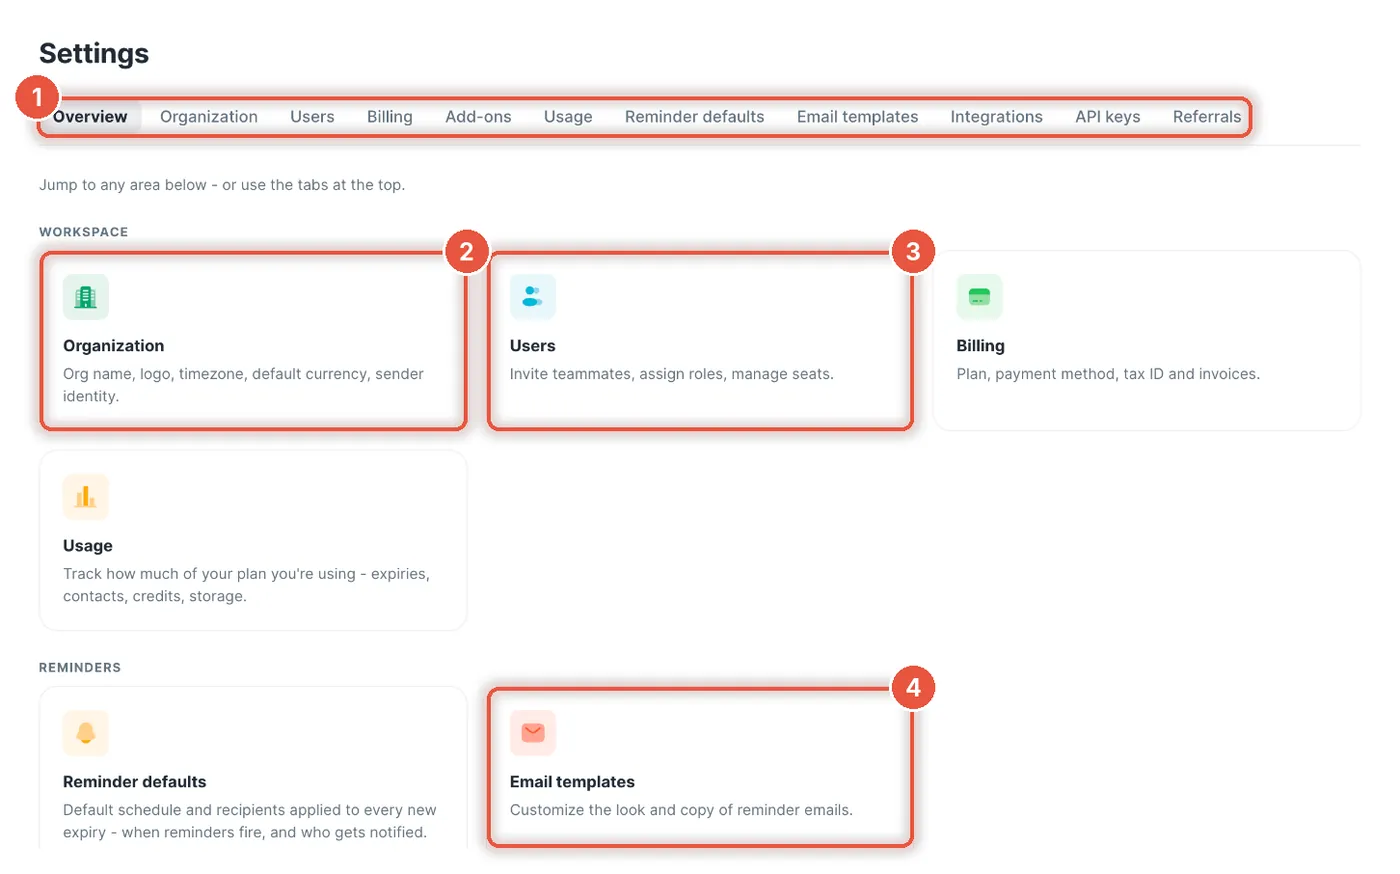
In the menu on the left, scroll to the Admin group at the bottom and click Settings. The Overview tab opens: a row of tabs at the top, cards below.
Click any tab along the top, or any card, to open that area of Settings.
Do you see a box called Finish setting up your workspace above the cards? Work through its list. Each line is something still missing.
The four steps below use two tabs: Organization and Users.
- 1
The tabs. Click one to open that area.
- 2
Organization: who you are and who your emails come from.
- 3
Users: invite people and set their roles.
- 4
Email templates: the wording and layout of your reminder emails.
Tip:Not an Admin? You'll see fewer tabs and cards. Organization, Users, Billing and Usage are for Admins only.
Step 2 / 4
Add your name, logo and currency
Why it helps:Your logo and name appear in the app and on the upload page a supplier opens to send a renewed certificate, so they know the request is really from you.
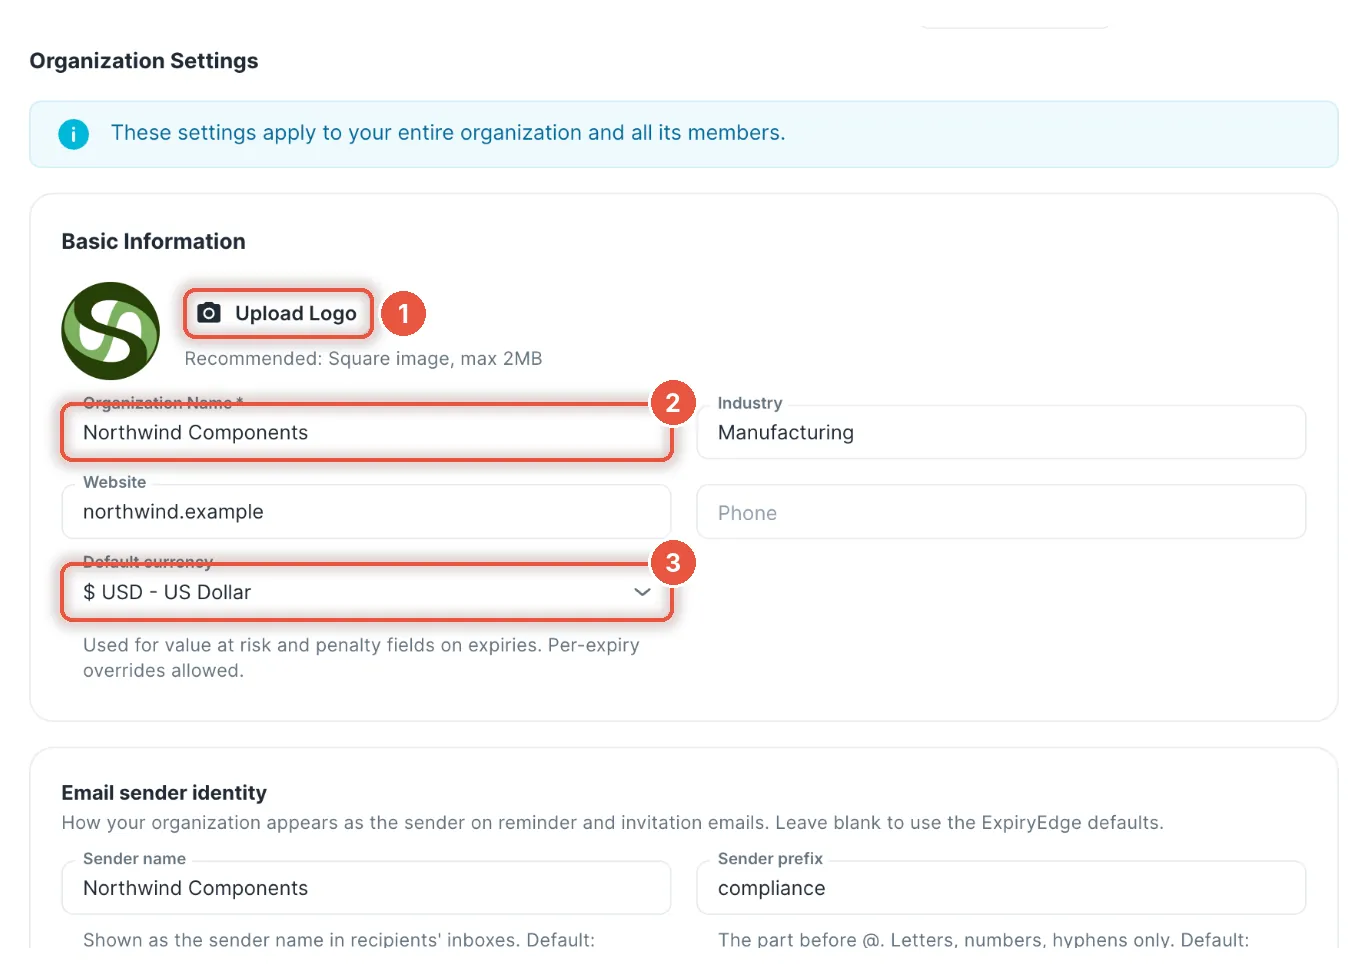
Still in Settings, click the Organization tab at the top. The first box on the Organization tab is Basic Information.
Click Upload Logo and pick a square image, ideally under 2 MB. You'll see Logo uploaded successfully.
Check the Organization Name. Use the name your suppliers and staff know, like "Northwind Components", not the legal entity.
Pick your Default currency. New expiries use this currency for the money at stake, such as a contract's value or a late penalty.
Under Date format, choose how dates appear, for example 31/12/2026 for a UK team. The date box saves on its own and shows Date format saved.
Scroll to the bottom of the Organization tab and click Save Changes to keep the logo, name and currency. You'll see Organization settings updated successfully!
- 1
Upload Logo: add your company logo.
- 2
Organization Name: the name people see.
- 3
Default currency: used for the value of new expiries.
Tip:One expiry can still have its own currency, like a US supplier contract priced in dollars. The default only saves you picking a currency each time.
Step 3 / 4
Choose who your emails come from
Why it helps:A supplier is far more likely to open an email from "Northwind Components" than one from an app they've never heard of.
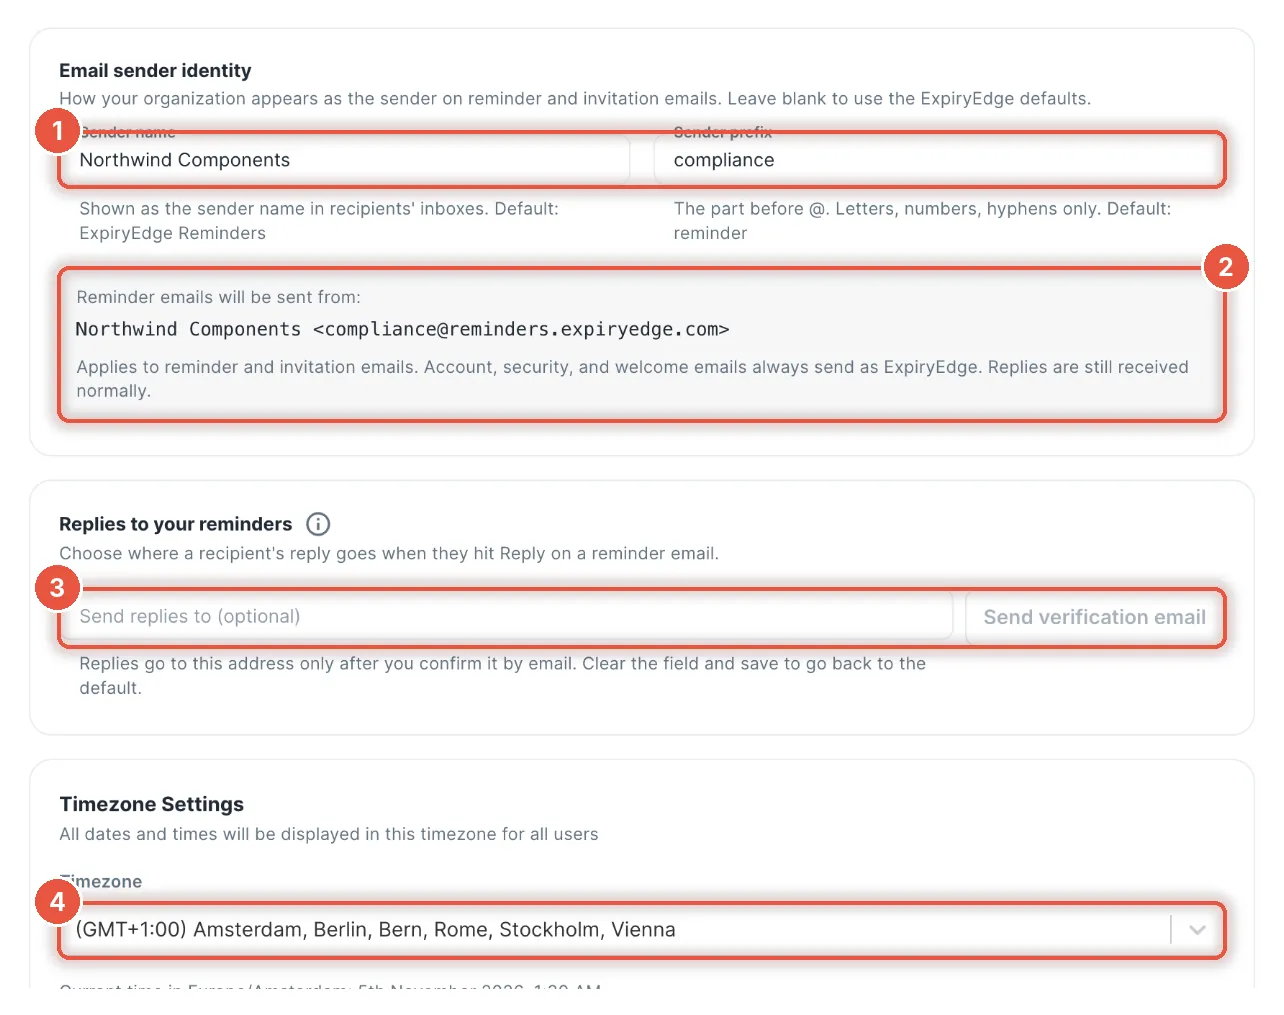
Stay on Settings › Organization and scroll down to Email sender identity. If the email boxes show a Paid feature label, your plan doesn't include them yet and reminders send as "ExpiryEdge Reminders".
Fill in Sender name. That's the name suppliers see in their inbox, like "Northwind Components".
Type a Sender prefix, like "compliance". The prefix is the part of the address before the @, so letters, numbers and hyphens only.
Read the grey box under the two fields. The grey box shows the exact address your reminders and invitations will come from.
Under Replies to your reminders, type the inbox that should get replies and click Send verification email. Open that inbox and click the link in the email to prove you own the address.
Scroll to Timezone Settings and check the Timezone. Reminders go out by this clock, and the line below shows the current time in that zone. Then click Save Changes.
- 1
Sender name and Sender prefix.
- 2
The address your reminder emails will come from.
- 3
Send replies to: where replies go once the address is verified.
- 4
Timezone: the clock your reminders go out by.
Watch out:Save Changes doesn't switch the reply address on. Only the link in the verification email does. Until someone clicks the link, the box says verification email sent, not confirmed yet and replies follow the default.
Tip:Leave the reply address empty if you'd rather keep replies inside ExpiryEdge. Each reply then shows up as a comment on that expiry. Replies sent to your own inbox aren't captured.
Step 4 / 4
Invite your team
Why it helps:Each colleague signs in as themselves, so you can assign them expiries and see who completed what.
Only Admins can invite. In the menu on the left, under Admin, click Users, then click Invite User. Northwind invites Lena from the quality team.
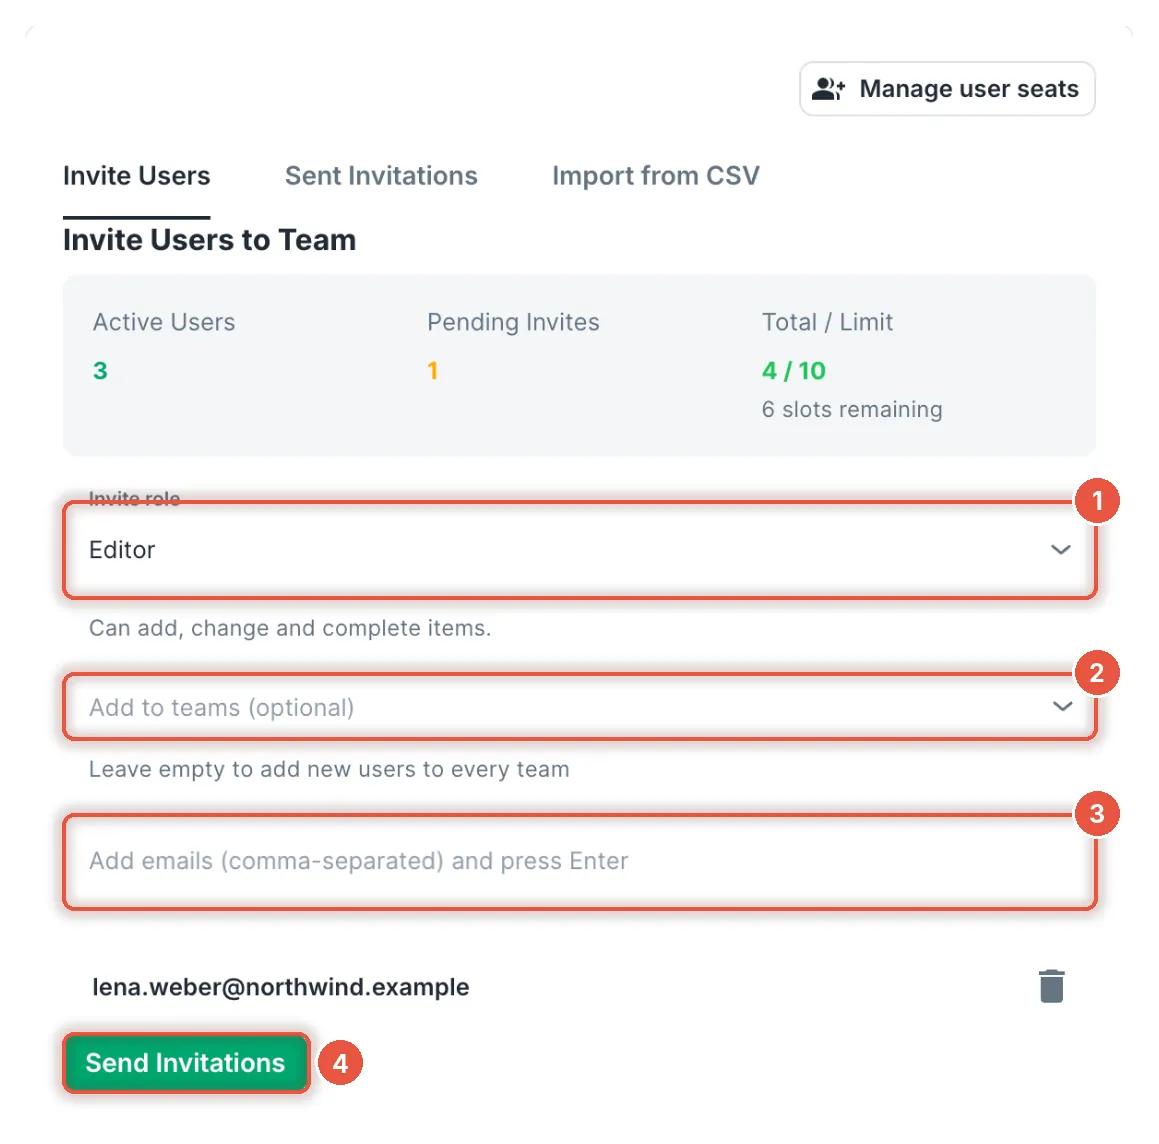
Pick an Invite role. Give most people Editor and keep Admin for whoever handles billing and users.
A team is a group of users, such as one department. Under Add to teams (optional), pick Lena's team, like Quality. Leave the field empty and she joins every team.
Need a team that doesn't exist yet? Create the team first under Admin › Teams with Create Team.
Type the email and press Enter. Add a few people at once by separating addresses with commas.
Click Send Invitations. You'll see Invitations sent successfully!, and each person gets an email with a link to join.
- 1
Invite role: Admin, Editor or Viewer.
- 2
Add to teams (optional): leave empty for every team.
- 3
Type the email and press Enter.
- 4
Send Invitations sends the emails.
Watch out:A contact is someone who receives reminders but never signs in, like a supplier or a site contact. Add those people as contacts instead of inviting them.
Tip:Each login uses one seat on your plan. The box at the top of the invite form counts active users and pending invites against your seat limit. If you run out, click Manage user seats.
Good to know
You're set up after the steps above. Come back to these when you need them.
Pick the reminder email you send
Why it helps:A supplier certificate reminder can ask for the new document, while a lease reminder goes to your landlord contact with different wording.
Custom email templates need the Pro Essentials plan or higher, so the free trial doesn't have them. On a smaller plan, reminders always go out as the System default, even when another template shows Active. If your plan has them, click Email templates under Reminders in the left menu. Each template is one reminder email: its subject, text and layout.
On the System default card, click Duplicate & edit. You get your own copy to change.
Or click New template, top right, to start from a blank page.
On your template's card, click the round button next to its name. You'll see Template selected, and the card gets an Active label.
An expiry type is the category you give an expiry, like Supplier certificate or Lease. To use the template for some types only, click the category icon at the bottom of its card and tick those types.
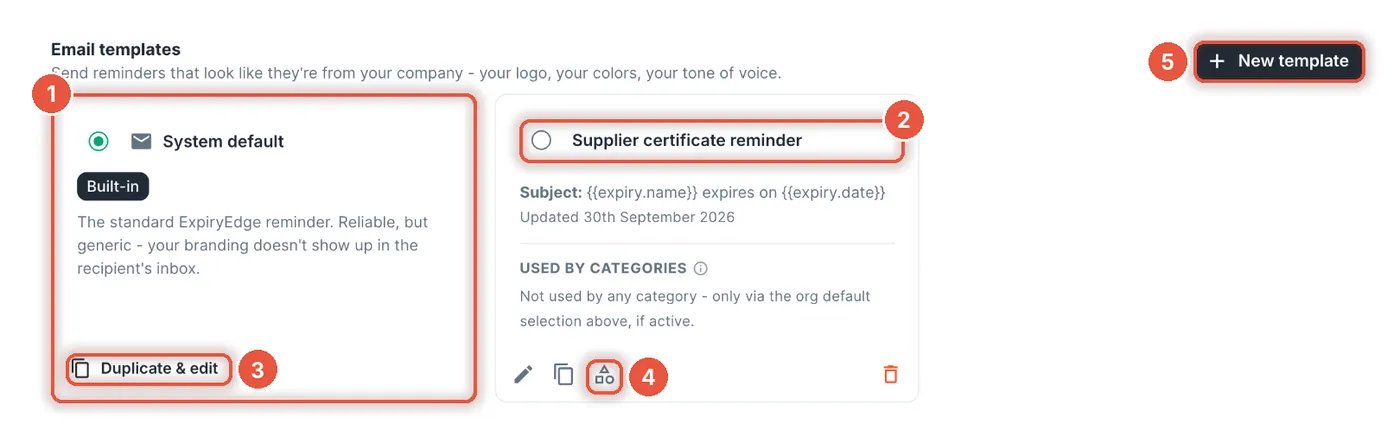
- 1
The System default email.
- 2
Your own template. Click the round button to make the template active.
- 3
Duplicate & edit makes a copy you can change.
- 4
Choose which expiry types use this template.
- 5
New template starts a blank one.
Tip:A template ticked for an expiry type wins over the active template. Every other type keeps the active template.
Write your own reminder email
Why it helps:A reminder that names the certificate and its expiry date in the subject gets answered sooner than a vague "action required" email.
On the Email templates page, find your template's card and click the pencil icon at its bottom left. The editor opens: you write on the left, and the right side shows a live preview filled with sample details.
Give the template a Template name (internal), like "Supplier certificate". Only your team sees this name.
Write the Email subject. A placeholder is a code in double curly braces, like {{expiry.name}} or {{expiry.date}}. Click a chip under Insert variable to add one where your cursor is.
Write the Email body. The Visual editor works like a normal text box. For complex layouts, such as tables or your own styling, switch to HTML and paste your code.
Leave Track opens and Track link clicks on to see who read the email and clicked its links. Turn them off if you'd rather not track outside contacts.
Check the preview, then click Save changes. You'll see Template updated.
To see the email in a real inbox, go to the menu on the left, under Reminders, and click Test Reminder. Type your own address in Email Address and click Send Test Email (1 Credit). The test fills your placeholders with sample details and uses one email credit.
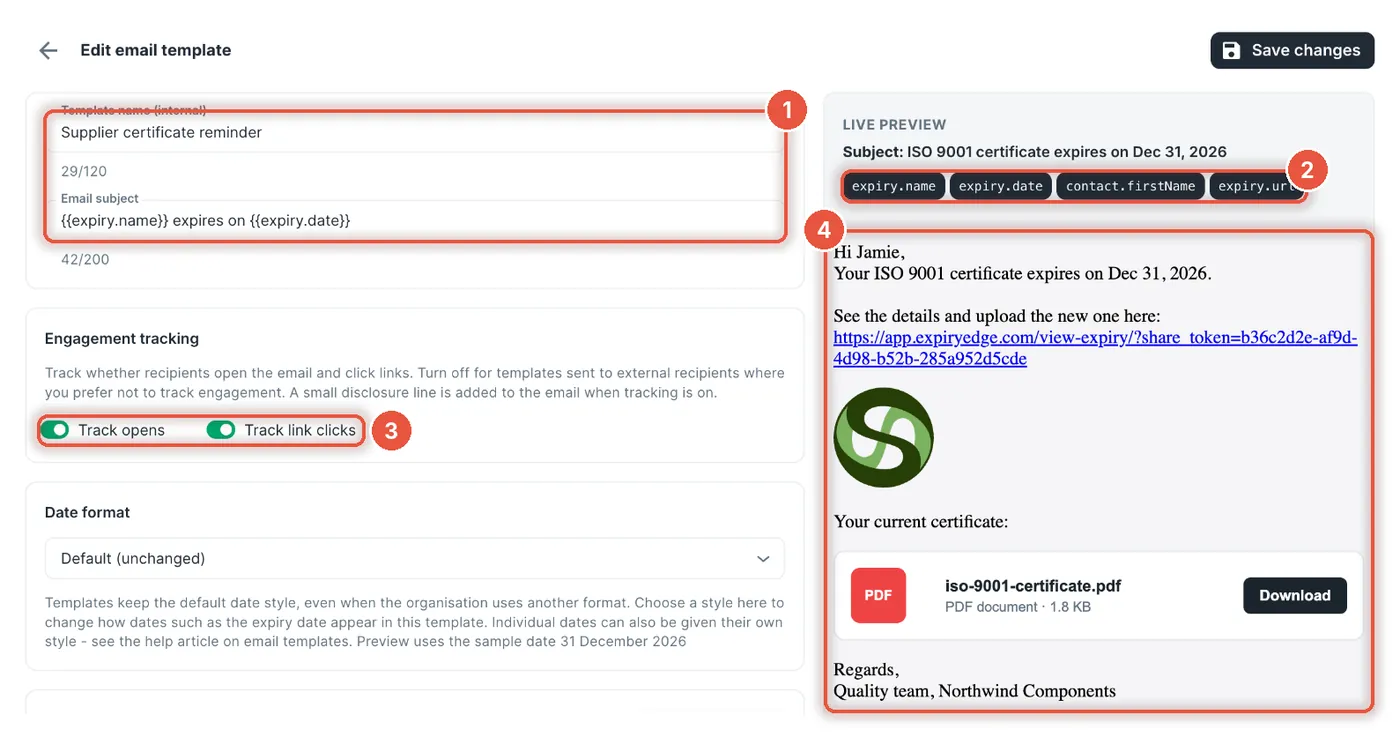
- 1
Template name (internal) and Email subject.
- 2
Placeholders. Each one is filled in from the expiry.
- 3
Engagement tracking: see who opened the email or clicked a link.
- 4
Live preview of the email.
Watch out:Switching from HTML back to Visual can strip tables and styling. If the editor offers Stay in HTML, click Stay in HTML.
Tip:When a real reminder goes out, each placeholder is replaced with that expiry's details. If an expiry doesn't have a detail, the spot stays blank.
Common mistakes
Each of these takes a minute to fix.
Only Admins can open the Organization tab. Ask an Admin to make the change, or to give you the Admin role.
A new address only takes over after someone clicks the link in the verification email. Check that inbox and its spam folder. The old address keeps working until then.
First check the Timezone on Settings › Organization. Then open Settings › Reminder defaults. A yellow Timezone Mismatch Detected warning means your reminders still run on an old clock: click Update Reminders to your timezone.
Check your plan first. Below Pro Essentials, and during the trial, the System default goes out whatever you pick. Then check that your template shows the Active label, and look at the expiry types ticked on other templates. A template ticked for that type goes out instead.
On Admin › Users › Invite User, open the Sent Invitations tab and check the spelling. Click the resend icon on that row, or click Copy Invitation Link and send the link yourself.
Questions beginners ask
No, only reminders and invitations. A password reset or other account email still comes from ExpiryEdge.
No. Inviting people and changing roles are Admin-only. An Editor can still add colleagues who already have a login to a team, under Admin › Teams.
Yes. A digest is one summary email per day. An Admin opens Settings › Reminder defaults, picks the When to send tab and sets Email delivery mode to Daily digest. SMS and WhatsApp still go one at a time.
No. A new format only changes how dates are shown. Custom email templates keep their own date style unless you pick one in the template.
Yes. Click the round button on System default.
When you're ready for more
Pick these up once the basics above are done.
Stuck on a step?
Email support@expiryedge.com and tell us which step you're on.